I am guessing a sand flee type of construct. Please continue.
[ATTACH]8060[/ATTACH]
[ATTACH]8059[/ATTACH]
BTW you are busted.
Attachments
image.jpg (31.85 KiB) Viewed 5632 times
Image1.jpg (10.93 KiB) Viewed 5617 times
Mike......... Rowlett, Texas, near Dallas
86 MK V 500/520. 59 MK 5 Greenie Shorty. SS Jointer, SS Planer,
SS Bandsaw, SS Lathe duplicator, SS Belt Sander,SS Molder & Shaper,
SS Tenon master jig, SS Mortising kit, SS 2 1/4' Drum Sanders, Ringmaster, DC3300....
One of the reasons I like this site is that I glean information from almost every link. I never thought of rounding my wheels using the sanding disc stationary over the spinning wheel. Thanks.
Gary Kalyn
Kalynzoo Productions
Woodworking
Porter Ranch/Northridge
Los Angeles, CA
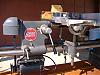
First before you all get to excited, I do not have the new powerpro headstock. Despite what you think you see it is not a new powerpro.... Just to prove it I will take a picture this afternoon with the speed dial in plane sight.
We were out shopping this morning but it is a nice sunny day so I hope to get on with a couple more parts of the project today. Boy after being out of the shop for so long it sure feels good to be making sawdust again.
Ed
{Knight of the Shopsmith} [Hero's don't wear capes, they wear dog tags]
On with the project. Today I worked on the PVC pipe to get it ready for assembly. I wanted to drill some holes but I also wanted the holes drilled at locations that worked well for this design.
Keep in mind balance is important so I wanted to place holes 120 degrees apart. That is I wanted 3 holes equally space around the pipe. There are many ways to do this but since it is my project I decided to use the computer to generate a pattern. I made a circle that is the same dia. of the outside of the pipe, stuck a triangle inside that and bingo I have the 120 degree spacing I wanted. See below:
[ATTACH]8069[/ATTACH]
The next photo shows a small cut off of the PVC so you can see how to locate the places to mark the pipe (yes the angles of the triangles).
[ATTACH]8071[/ATTACH]
Now for the real thing, the pipe had the tape on it from the cutting process and that makes a great place to mark the locations.
[ATTACH]8074[/ATTACH]
Now I want to transfer that mark to the other end of the tube and even along the whole pipe. Anyone have a favorite way to do that? If not then lets use my way. This is really a cool little trick I learned along the way and keep this chunk of angle for projects like this. By the way the blue tape in the pipe is a label of which side it is, B in this picture.
[ATTACH]8076[/ATTACH]
You put the cylinder in the angle and align the mark. Now the mark can be run across the hole cylinder and be straight.
[ATTACH]8077[/ATTACH]
This will have to continue on the next post as I'm out of 5 allotments of picture per post.
Ed
Attachments
DSCF7526sc.jpg (29.01 KiB) Viewed 4889 times
DSCF7527sc.jpg (23 KiB) Viewed 4889 times
DSCF7528sc.jpg (16 KiB) Viewed 4891 times
DSCF7530sc.jpg (74.52 KiB) Viewed 4890 times
DSCF7532sc.jpg (32.25 KiB) Viewed 4893 times
{Knight of the Shopsmith} [Hero's don't wear capes, they wear dog tags]
One more picture showing the line extended to the other end of the pipe.
[ATTACH]8078[/ATTACH]
Next I put tape over the edge of the tube so I can mark the edge as well. Now you can see that in addition to the marks on the blue tape there are marks 180 deg. or a half circle from each blue tape mark. I'll explain why in a moment but first I want to show how you do that.
[ATTACH]8082[/ATTACH]
The best way I know to do this is to use a center gauge. On the right is a purchased one, on the left is a hand built one I did many many years ago out of wood and used for many many years.
[ATTACH]8083[/ATTACH]
The next photo shows the center finder in action letting me mark the edge across the pipe.
[ATTACH]8084[/ATTACH]
In the next post we will see the reason for those lines.
Ed
Attachments
DSCF7534sc.jpg (42.95 KiB) Viewed 4881 times
DSCF7536sc.jpg (54.95 KiB) Viewed 4879 times
DSCF7537sc.jpg (67.42 KiB) Viewed 4884 times
DSCF7539sc.jpg (48.02 KiB) Viewed 4884 times
{Knight of the Shopsmith} [Hero's don't wear capes, they wear dog tags]
Moving to the drill press we want to drill holes that are vertical. With a cyclical part it is sometime difficult to determine where that is. However with the aid of a square and the lines you can make sure you are drilling right where you want to. Shown first is a square but you are off set from the marks and it can be tricky to sight the lines in reference to the square.
[ATTACH]8085[/ATTACH]
It is often easier and correct enough to use a chunk of wood that you know has been cut square as is shown in the next picture.
[ATTACH]8086[/ATTACH]
Once you have things aligned you simply drill the holes needed. For the time being I'm not going to detail that. I'm at this point not sure how the project is going to prove out so I think it best to say that details will follow for this portion.
The next post will continue on but jumping to another phase. I'll be working on that later this evening time permitting.
Ed
Attachments
DSCF7541sc.jpg (47.82 KiB) Viewed 4881 times
DSCF7543sc.jpg (49.56 KiB) Viewed 4879 times
{Knight of the Shopsmith} [Hero's don't wear capes, they wear dog tags]
OK, so how did he get the new head. I know we can make the decal and use the top half to make us feel better and wish. but does he really have one? That is the question. I don't think it is a pipe bomb:rolleyes:
Bill
Broken Arrow OK
MKV, 510, MKVll, 50th Anniversary 520 with Jointech saw train, Bandsaw, scroll saw, joiner, 6" Sander,Stand Alone Pin Router and Router Table, Strip Sander, Jigsaw & (4) ER's plus Jigsaw for ER. DC SS RAS
The next phase is attaching a lathe faceplate to one of the wheels I made the other day. You might want to check this post for more information on the faceplate: http://www.shopsmith.net/forums/showthread.htm?t=5099
The thing here is to use the shaft to align the two parts so when you put the screws in things will be aligned and stay aligned. I ended up using 4 screws each 1" long. I don't expect any "pressure" on this drive system so this should be fine enough. Pictured is the "wheel" and the faceplate both on the 5/8" shaft.
[ATTACH]8087[/ATTACH]
The next 3 images show the drum assembly. This was as far as I got today. I have to see if I have any plywood around that is large enough for the bottom... if so I might get around to cutting that and mounting some of the hardware to it. If not I might have to go shopping and again the weather remains a question on progress.
[ATTACH]8089[/ATTACH]
[ATTACH]8090[/ATTACH]
[ATTACH]8091[/ATTACH]
Ed
Attachments
DSCF7545sc.jpg (62.91 KiB) Viewed 4866 times
DSCF7547sc.jpg (76.97 KiB) Viewed 4886 times
DSCF7548sc.jpg (52.63 KiB) Viewed 4863 times
DSCF7549sc.jpg (70.95 KiB) Viewed 4868 times
{Knight of the Shopsmith} [Hero's don't wear capes, they wear dog tags]
Reible, I'm enjoying reading about this project and can't wait to see the next part. Along with redacted photos of the not a Power Pro headstock.
Heath
Central Louisiana
-10ER - SN 13927, Born 1949, Acquired October 2008, Restored November, 2008
-10ER - SN 35630, Born 1950, Acquired April 2009, Restored May 2009, A34 Jigsaw
-Mark V - SN 212052, Born 1986, Acquired Sept 2009, Restored March 2010, Bandsaw
-10ER - SN 39722, Born 1950, Acquired March 2011, awaiting restoration
I almost forgot, I promised a photo of showing that this shopsmith is not equipped with a powerpro... it does however have some blue tape hanging on it.
[ATTACH]8094[/ATTACH]
Ed
Attachments
DSCF7546sc.jpg (42.82 KiB) Viewed 4883 times
{Knight of the Shopsmith} [Hero's don't wear capes, they wear dog tags]