Restoration Progress On My 1952 ER10
Moderators: HopefulSSer, admin
-
mbcabinetmaker
- Platinum Member
- Posts: 1627
- Joined: Thu Jul 20, 2006 6:18 am
- Location: Greer SC

-
mbcabinetmaker
- Platinum Member
- Posts: 1627
- Joined: Thu Jul 20, 2006 6:18 am
- Location: Greer SC
-
mickyd
- Platinum Member
- Posts: 2999
- Joined: Mon Feb 09, 2009 1:18 pm
- Location: San Diego, CA
- Contact:
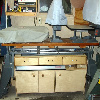
This is my mobile (and currently ONLY) workbench. The casters are made of bicep material. Took me a while to get the distressed look on the bench top. Each apparent defect was painstakingly added using various proprietary techniques. 
.
.
[ATTACH]7439[/ATTACH]
.
.
[ATTACH]7439[/ATTACH]
- Attachments
-
- Img_8062mod.jpg (371.29 KiB) Viewed 4084 times
Mike
Sunny San Diego
Sunny San Diego
-
mickyd
- Platinum Member
- Posts: 2999
- Joined: Mon Feb 09, 2009 1:18 pm
- Location: San Diego, CA
- Contact:
I thought my ER restoration was finally done…]that[/B] bad but I just want to say "DONE" and get some final pictures posted.mickyd wrote:I put the finishing touches on the ER today. She's fully assembled. As I put everything back together.......
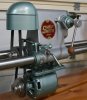
This morning I went out to grab a couple things I needed to bring to work and noticed that I hadn't put the miter gage indicator back on. That's the thing with an arrow on it that screws onto the miter gage bar and points to the angular reading as you swivel the miter gage casting. Slam dunk right? If you followed my Greenie post, you know that I use the Ziploc bag disassembly method to keep organized as shown at the bottom of this post. Well, the indicator was still in its miter gage baggie, the last remaining baggie / last remaining piece. Went to screw it on to the miter bar but I couldn’t get the indicators thru hole to line up with the threaded hole in the miter bar. After saying a couple times “This is impossible!!”, I looked at the exploded view / parts list in the manual to see if I was missing something obvious. Parts list showed an additional 2 components as part of the indicator, those being an indicator button, and an indicator spring. My first thought was that I didn't recall seeing these 2 parts in the miter gage baggie and second, I dismissed that as being the reason the hole weren't lining up.
In application, the function of the indicator button and spring is that as the miter gage casting is swiveled, the spring loaded button retracts then slips down into the 15° incremented V grooves on the face of the casting to provide quick positive stop at 0°, 15°, 30°, 45°, and 60°. I looked again in the ‘empty’ miter gage parts bag to see if I missed them. Not there!! I picked up the actual indicator, looked at the end of it and I saw why the 2 parts weren’t in the bag….
.
.
.
[ATTACH]7440[/ATTACH]
.
.
Much to my surprise (ya right!!), the button is frozen solid into its hole drilled into the face of the indicator. The reason the thru hole didn’t line up was because the button can not retract so unless it’s in a groove, it hits the face of the miter gage casting.
This HAS TO BE the ER’s last great act of defiance!!! It’s like every piece has been possessed and I have had to do an exorcism on them. So now, I am faced with how to get this button unstuck. Like a mad man, the first thought was to use 'Kroil'. Maybe this will be it’s shining moment.
What I did before I left was put the whole thing in a small glass baby food jar and I sprayed ¼” of Kroil in it and it’s soaking. Got to work and have a vision of the Kroil working and the spring shooting the button out like a projectile, breaking the glass jar, and having both pieces disappear somewhere. Made me chuckle.
Anyway, can anyone post a photo of what this button / spring looks like? In case I have to drill it out and recreate it, I’d like to know what I am up against. I am sure it's simple but would like to see it first.
- Attachments
-
- IMG_8099mod.JPG (163.41 KiB) Viewed 4077 times
Mike
Sunny San Diego
Sunny San Diego
-
judaspre1982
- Platinum Member
- Posts: 1237
- Joined: Tue Jul 08, 2008 10:10 pm
=========================
Last edited by judaspre1982 on Sun May 14, 2017 11:48 am, edited 1 time in total.
Mike - You can look at and measure the one on my miter gauge if you like.mickyd wrote:....Anyway, can anyone post a photo of what this button / spring looks like? In case I have to drill it out and recreate it, I’d like to know what I am up against. I am sure it's simple but would like to see it first.
Rob in San Diego
Email: SDSSmith51 AT gmail.com
Email: SDSSmith51 AT gmail.com
-
------------------------
- Gold Member
- Posts: 397
- Joined: Fri Jan 01, 2010 2:10 am