Sorry to change the subject... But I just got my 10ER yesterday amd waiting to get more pieces to it from the last owner. But how do you tell the Manufature date??? The seriel number on mine reads ER29257.
Thanks in advance.
Bob
ozarkboy2 wrote:Sorry to change the subject... But I just got my 10ER yesterday amd waiting to get more pieces to it from the last owner. But how do you tell the Manufature date??? The seriel number on mine reads ER29257.
Thanks in advance.
Bob
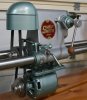
Here's a close up shot of the broken screw drill out. The screw is one of two that holds the saw blade insert on the worktable. I used the hinge bit drill set Remember the hinge drill bit set claimed "NEVER Miss the Center of the Hole Again!"? Well, I missed the center of the hole. Completely my fault though.
.
.
[ATTACH]7301[/ATTACH]
.
.
The reason I missed was because as I mentioned in my previous post, the thru hole in the table insert was larger than the screw diameter that had broken off, resulting in too much play. What the 'little guy in my head' was saying to do was instead of using the saw blade insert as the guide, rather make a centering jig from a piece of wood by drilling a though hole the size of the major diameter of the broken screw. Placing that wood over the slightly protruding screw would have centered things correctly. All I would have had to do to finish the jig would be to put a countersink on the hole for the hinge bit to center on and I would have had an accurate jig to find the center of the broken screw. I second guessed that idea and went with visually aligning the table insert hole over the broken screw and clamping it in place. It looked real close but obviously wasn't. I know the reason I second guessed it too. My plan 'B' was already etched in stone in my head to fall back on if it failed. I knew plan 'B' would work, that being drill and tap the new set of holes that could be used by simply turning the table insert 180°. I actually wanted to use plan 'B' as my plan 'A' initially since I felt it would be easier. The only reason I didn't was I just wasn't positive if there was a reason why the 2 mounting holes were both left of center. Still don't know for sure.
Since I boatched up the first hole, I didn't bother doing anything with the second broken screw. I instead went with plan 'B' (new holes on right of center) and managed to knock that complete job off, including tapping the holes, in less than 10 minutes. FYI - I had invensted 1 hour on my failed attempt. The hinge bit drill set worked great for plan 'B'. I just clamped the saw insert into its mating hole and drilled out the two holes.
.
.
[ATTACH]7302[/ATTACH]
.
.
[ATTACH]7303[/ATTACH]
mickyd wrote:Are you addressing the first 3 sentences to me? If so, 'no entiendo' either one of them.
Drill bits in hinge bit set are standard replaceable high speed steel bits. They are for use on wood, metal, and plastic.
You and Tim are overlooking the source!!!!! I be more cautious in my expectations of 'tools' purchased 'there'!
╔═══╗
╟JPG ╢
╚═══╝
Goldie(Bought New SN 377425)/4" jointer/6" beltsander/12" planer/stripsander/bandsaw/powerstation /Scroll saw/Jig saw /Craftsman 10" ras/Craftsman 6" thicknessplaner/ Dayton10"tablesaw(restoredfromneighborstrashpile)/ Mark VII restoration in 'progress'/ 10E[/size](SN E3779) restoration in progress, a 510 on the back burner and a growing pile of items to be eventually returned to useful life. - aka Red Grange
mark-b wrote:Now the drill maker is going to have to change his logo :-)
Mark
[ATTACH]7312[/ATTACH]
You know, I thought the same thing but technically, with thier tool, I haven't missed with it AGAIN. This was the first time. AGAIN implies a repeated occurance.
JPG40504 wrote:1. I Noticed the multiple set screw tracks! 2. Hopefully you will add only one new set! 3.'Somebody' was not following earlier posts(heat)!!!!!
......
What do these three mean?? Need more data please.
JPG40504 wrote:You and Tim are overlooking the source!!!!! I be more cautious in my expectations of 'tools' purchased 'there'!
Actually, the drill cut through the fastener quite well. Nice continuous chip. When it dulls, I either sharpen or replace. There is not much to be cautious about on a $5 purchase.
It still looks better than one of my tables that has a couple of stray holes drilled into it from when used as a drill press with no reguard for where the table was positioned.
Mark
JPG40504 wrote:You and Tim are overlooking the source!!!!! I be more cautious in my expectations of 'tools' purchased 'there'!
While those probably are made in China, and will probably knot last as long as a "good" bit, they are still intended for steel cutting along with wood and plastic. I actually quit buying Irwin bits exactly because of that (Irwin bought out a company that I really liked (Ace/Hanson) that manufactured bits, stamp sets, tap and die tools and the like. 100% US made, but now, all made in China. I have been buying "better" bits from a local supplier of fasteners (Tacoma Screw). I can knot recall the brand, but they are superb. The next time I buy some, I will post the brand.
Tim
Buying US made products will help keep YOUR job or retirement funds safer.
I put the finishing touches on the ER today. She's fully assembled. As I put everything back together, some things really stood out as UGLY!!! The steel parts that I wire brushed to get the rust off looked horrible once assembled. On the parts table, the cosmetics didn't stand out, but getting them next to pristine paint and shiny aluminum knob.....just couldn't leave them like that.
Here's the extension table fence guide
.
.
[ATTACH]7433[/ATTACH]
.
. The quill gauge rod (aka stop rod)
.
.
[ATTACH]7434[/ATTACH]
.
. Speed changer knob
.
.
[ATTACH]7435[/ATTACH].
.
Miter gage bar
.
.
[ATTACH]7436[/ATTACH]
.
.
Attacked all of these with the belt sander with an 80 grit belt. Now, the family was worthy of going back on the machine.
.
.
.
.
.
.
.
.
[ATTACH]7437[/ATTACH]