Restoration Progress On My 1952 ER10
Moderators: HopefulSSer, admin
I have a screw driver like that.
SS 500(09/1980), DC3300, jointer, bandsaw, belt sander, Strip Sander, drum sanders,molder, dado, biscuit joiner, universal lathe tool rest, Oneway talon chuck, router bits & chucks and a De Walt 735 planer,a #5,#6, block planes. ALL in a 100 square foot shop.
.
.
Bob
.
.
Bob
-
JPG

- Platinum Member
- Posts: 34643
- Joined: Wed Dec 10, 2008 7:42 pm
- Location: Lexington, Ky (TAMECAT territory)
I have a pair of diagonal cutters like that!:Dbeeg wrote:I have a screw driver like that.
╔═══╗
╟JPG ╢
╚═══╝
Goldie(Bought New SN 377425)/4" jointer/6" beltsander/12" planer/stripsander/bandsaw/powerstation /Scroll saw/Jig saw /Craftsman 10" ras/Craftsman 6" thicknessplaner/ Dayton10"tablesaw(restoredfromneighborstrashpile)/ Mark VII restoration in 'progress'/ 10E[/size](SN E3779) restoration in progress, a 510 on the back burner and a growing pile of items to be eventually returned to useful life. - aka Red Grange
-
mickyd
- Platinum Member
- Posts: 2999
- Joined: Mon Feb 09, 2009 1:18 pm
- Location: San Diego, CA
- Contact:
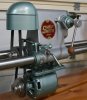
Localized electolysis
Giving the ER10 a "cat bath" tonight. I'm doing this localized electrolysis to give the frozen tie bar, speed changer, and headstock a clean surface to slide on once I unfreeze them with "Kroil" penetrating liquid next week. The end is submerged in the washing soda / water electrolyte solution to about 1" below the level of the aluminum speed changer. This is because electrolysis process can pit the aluminum.
.
.
.
[ATTACH]4848[/ATTACH]. . . [ATTACH]4849[/ATTACH]
.
.
.
[ATTACH]4850[/ATTACH]
.
.
.
You'll notice the important battery charger lead connections. It is absolutely critical that you get this right
.
.
.
[ATTACH]4848[/ATTACH]. . . [ATTACH]4849[/ATTACH]
.
.
.
[ATTACH]4850[/ATTACH]
.
.
.
You'll notice the important battery charger lead connections. It is absolutely critical that you get this right
- Black negative lead on battery charger goes on the item you want cleaned. In my setup, I am connected to a C-Clamp that is tightened onto on of the way tube. I did a localized wire brushing of the way tube in order to remove the rust where the clamp makes contact to ensure good current flow.
- Red positive lead is connected to the sheet metal electrode. I always use sheet metal vs. rebar or thread rods shown on a lot of internet website on electrolysis. It had a much greater surface area so the rust that it removes gets spread out over a greater area. Use rebar and one, it takes longer and two, you have to clean off the rebar because the rust buildup on them reduces the effectiveness.
- Attachments
-
- Img_6064mod.jpg (43.78 KiB) Viewed 7557 times
-
- Img_6063mod.jpg (49.26 KiB) Viewed 7562 times
-
- Img_6065mod.jpg (40.8 KiB) Viewed 7564 times
Mike
Sunny San Diego
Sunny San Diego
-
robinson46176
- Platinum Member
- Posts: 4182
- Joined: Mon Mar 09, 2009 9:00 pm
- Location: Central Indiana (Shelbyville)
This kind of "stuck" problem is pretty common on farm equipment especially on stuff that has to sit out in the weather.
Go get one of these (see link) and find a piece of heavy steel "at least" 1/4" thick and about 2" to 3" either round or square and drill a hole in the center around 1/8th inch or so. Stick the point of the round chisel tool in the hole and hold the plate against the end of a way tube firmly and squarely and start with some quick trigger burst. Don't go wild or you will mushroom the end of the way tube eventually. Of course a small amount right at the end can be ground, sanded or filed back down. A bushing driver with a pilot and shoulder would be better than a flat if you can find or make one. Wood will not likely work since you really need the direct hard impact to shake things.
http://www.harborfreight.com/cpi/ctaf/displayitem.taf?Itemnumber=92037
--
farmer
Francis Robinson
I did not equip with Shopsmiths in spite of the setups but because of them.
1 1988 - Mark V 510 (bought new), 4 Poly vee 1 1/8th HP Mark V's, Mark VII, 1 Mark V Mini, 1 Frankensmith, 1 10-ER, 1 Mark V Push-me-Pull-me Drillpress, SS bandsaw, belt sander, jointer, jigsaw, shaper attach, mortising attach, TS-3650 Rigid tablesaw, RAS, 6" long bed jointer, Foley/Belsaw Planer/molder/ripsaw, 1" sander, oscillating spindle/belt sander, Scroll saw, Woodmizer sawmill
-
mickyd
- Platinum Member
- Posts: 2999
- Joined: Mon Feb 09, 2009 1:18 pm
- Location: San Diego, CA
- Contact:
robinson46176 wrote:This kind of "stuck" problem is pretty common on farm equipment especially on stuff that has to sit out in the weather.
Go get one of these (see link) and find a piece of heavy steel "at least" 1/4" thick and about 2" to 3" either round or square and drill a hole in the center around 1/8th inch or so. Stick the point of the round chisel tool in the hole and hold the plate against the end of a way tube firmly and squarely and start with some quick trigger burst. Don't go wild or you will mushroom the end of the way tube eventually. Of course a small amount right at the end can be ground, sanded or filed back down. A bushing driver with a pilot and shoulder would be better than a flat if you can find or make one. Wood will not likely work since you really need the direct hard impact to shake things.
http://www.harborfreight.com/cpi/ctaf/displayitem.taf?Itemnumber=92037
Is the intent of this to vibrate the beejeezes out of the tubes to break the corrosive bond?
Good price on the tool at $6.99! I'd look a little strange blowing into the air input however since I don't have a compressor yet. 90 psi would be a real struggle:D .
Mike
Sunny San Diego
Sunny San Diego
-
robinson46176
- Platinum Member
- Posts: 4182
- Joined: Mon Mar 09, 2009 9:00 pm
- Location: Central Indiana (Shelbyville)
mickyd wrote:Is the intent of this to vibrate the beejeezes out of the tubes to break the corrosive bond?
Good price on the tool at $6.99! I'd look a little strange blowing into the air input however since I don't have a compressor yet. 90 psi would be a real struggle .
That is right. you must have movement of some kind even if it so small you have to measure it with a micrometer...
Basically you have a machine that is constipated and one way or the other it is either have movement or surgery.
-
Maybe you can borrow a bucket of compressed air from a neighbor. I say that as a joke but if you know someone with a compressor and a portable air tank there is a good chance that maybe that would be enough air to shake it loose.
-
Don't try to blow 90 PSI with your lungs, there is a good chance you could end up with a lot worse problem than a constipated machine.
--
farmer
Francis Robinson
I did not equip with Shopsmiths in spite of the setups but because of them.
1 1988 - Mark V 510 (bought new), 4 Poly vee 1 1/8th HP Mark V's, Mark VII, 1 Mark V Mini, 1 Frankensmith, 1 10-ER, 1 Mark V Push-me-Pull-me Drillpress, SS bandsaw, belt sander, jointer, jigsaw, shaper attach, mortising attach, TS-3650 Rigid tablesaw, RAS, 6" long bed jointer, Foley/Belsaw Planer/molder/ripsaw, 1" sander, oscillating spindle/belt sander, Scroll saw, Woodmizer sawmill
farmer
Francis Robinson
I did not equip with Shopsmiths in spite of the setups but because of them.
1 1988 - Mark V 510 (bought new), 4 Poly vee 1 1/8th HP Mark V's, Mark VII, 1 Mark V Mini, 1 Frankensmith, 1 10-ER, 1 Mark V Push-me-Pull-me Drillpress, SS bandsaw, belt sander, jointer, jigsaw, shaper attach, mortising attach, TS-3650 Rigid tablesaw, RAS, 6" long bed jointer, Foley/Belsaw Planer/molder/ripsaw, 1" sander, oscillating spindle/belt sander, Scroll saw, Woodmizer sawmill
-
mickyd
- Platinum Member
- Posts: 2999
- Joined: Mon Feb 09, 2009 1:18 pm
- Location: San Diego, CA
- Contact:
The electrolysis process ran overnight cleaning the rust off the tie bar end of the way tubes. As you recall, I could only submerge the tubes up to the aluminum speed changer since aluminum cannot safely go into the solution. I checked after 15 hrs and the tubes were free of rust.
The shot on the left is what they looked like immediately after taking them out. Notice that the electrolysis also works great as a paint remover!! The tubes are still covered with black oxide residue that brushes off real easy. On the right, I cleaned the tubes but only up to the tie bar with a brass wire wheel mounted on a drill. I was then able to tap the tie bar with a hammer and wooden block alternating side to side to remove it. It came off pretty easy.
.
.
[ATTACH]4864[/ATTACH]. . .[ATTACH]4865[/ATTACH]
.
.
Remember, once I got the aluminum speed changer off, my plans where to do the electrolysis on the remaining entire assembly (way tubes, headstock, carriage, and tailstock).
I was going to wait until the "Kroil" penetrating oil came in next week before trying to remove the speed changer because that was frozen solid too. I was afraid to break it if I applied too much force to it. Could I wait for the "Kroil" before I tried it? Of course not!! I have RARELY been able to wait for things.
So, I cleaned the way tubes all the way up to the speed changer. I was curious to see if it would budge since the tubes were now rust free all the way up to it. If I could move it, I figured I could get it off without the "Kroil". I set up a bunch of wooden wedges between the headstock and the speed changer and started gently tapping them with a hammer.
.
.
[ATTACH]4866[/ATTACH]
.
.
As I tapped, I noticed the gap opening up. What I thought was the speed changer moving actually turned out to be the headstock. Even though I hadn't removed the rust from the tubes on the other side of the headstock, it was actually moving in that direction. As it moved, the tubes under it (on the speed changer side) were rust free. Makes sense since the headstock was protecting the tubes from the weather. I then started pounding the headstock only with a 2x4 and mallet. Got it to move about 6" pretty quickly. That gave me room to be able to tap the speed changer down near the way tube with a 2x4 and mallet in the opposite direction toward the section of the way tubes that went through the electrolysis. It wouldn't budge however. Remembering what farmer had said previously about tapping it in the opposite direction, I tried that, tapping it toward the headstock. IT STARTED TO MOVE!!! The more it moved, the easier it got since it was moving onto the clean tubes that were protected under by the headstock. Underneath the speed changer was nasty thick white corrosion. Eventually, the speed changer was completely onto the clean section of tube and was moving by hand. That gave me a chance to clean the white corrosion off the tubes and try sliding the speed changer back were it came from. It slide right over the spot where it was previously frozen. SUCCESS!! I was able to get the speed change off the way tubes!!! Since I felt lucky, I also tried removing the headstock. Although it didn't move quite as easy, it moved with gentle persuasion with the hammer and 2x4. I got it it off with only a little effort.
.
.
.
[ATTACH]4862[/ATTACH]
.
.
.
Sorry heathicus. I know your going to hate me considering how hard you had to struggle with your unit even WITH the "Kroil". The difference I think is the electrolysis. It removes all the rust, even down in the pits. I would guess that possibly with the hand sanding you did to your tubes, there was still rust in the pits. As you tried to slide across that, it may have picked up rust particles that caused the interference. I don't know for sure but that's my guess.
Anyway, that's it for now. I am going to go put the way tube assembly in the large wooden box electrolysis tankto finish it up. Maybe I'll be as successful removing the carriage and tailstock. Those are frozen solid too.
Since I have room in this post for one more photo, thought I'd show you what my rear motor bearing looks like. I think that is DEFINITELY going to take the "Kroil" to dislodge it from the housing!!!
.
.
.
[ATTACH]4863[/ATTACH]
- Attachments
-
- Img_6079mod.jpg (88.95 KiB) Viewed 7525 times
-
- Img_6070mod.jpg (53.6 KiB) Viewed 7520 times
-
- Img_6072mod.jpg (60.56 KiB) Viewed 7522 times
-
- Img_6073mod.jpg (46.47 KiB) Viewed 7524 times
-
- Img_6075mod.jpg (80.06 KiB) Viewed 7526 times
Mike
Sunny San Diego
Sunny San Diego
-
JPG
- Platinum Member
- Posts: 34643
- Joined: Wed Dec 10, 2008 7:42 pm
- Location: Lexington, Ky (TAMECAT territory)
While you are 'waiting' for the kroil, pour some evaporust on to that bearing and let it soak overnight.
╔═══╗
╟JPG ╢
╚═══╝
Goldie(Bought New SN 377425)/4" jointer/6" beltsander/12" planer/stripsander/bandsaw/powerstation /Scroll saw/Jig saw /Craftsman 10" ras/Craftsman 6" thicknessplaner/ Dayton10"tablesaw(restoredfromneighborstrashpile)/ Mark VII restoration in 'progress'/ 10E[/size](SN E3779) restoration in progress, a 510 on the back burner and a growing pile of items to be eventually returned to useful life. - aka Red Grange
╟JPG ╢
╚═══╝
Goldie(Bought New SN 377425)/4" jointer/6" beltsander/12" planer/stripsander/bandsaw/powerstation /Scroll saw/Jig saw /Craftsman 10" ras/Craftsman 6" thicknessplaner/ Dayton10"tablesaw(restoredfromneighborstrashpile)/ Mark VII restoration in 'progress'/ 10E[/size](SN E3779) restoration in progress, a 510 on the back burner and a growing pile of items to be eventually returned to useful life. - aka Red Grange
-
mickyd
- Platinum Member
- Posts: 2999
- Joined: Mon Feb 09, 2009 1:18 pm
- Location: San Diego, CA
- Contact:
Removing logoplate aka nameplate aka badge from headstock
Since I am going to recreate the ShopSmith nameplate, I needed to remove the faded one currently on the machine. The nameplates should be held on with two U-drive screws.
.
.
.
[ATTACH]4869[/ATTACH]
.
.
.
Mine only had one on the top and a machine screw on the bottom. Somewhere in it's genealogy, a previous owner felt the need to have access into the headstock so they drilled and tapped a hole for the screw.
The U-drive screws can be a challenge to remove since the head is a round head with no slot or cross recess (aka phillips) drive. To get them out, you need to either drill them out OR push them out from the inside if there is an access hole behind it. In my case, there is a 1/8" diameter access hole as seen in this photo looking UP into the headstock.
.
.
.
[ATTACH]4868[/ATTACH]
.
.
.
Since there is no room up inside the headstock to get a swing, most people probably grind a flat on the head and drill the head off then push it through. This can be a chore and a drill killer since the screw is hardened.
I made a tool where I could go up inside the headstock and push the U-drive screw out with a wedge. The tool is a 3/8" piece of drill rod at least a foot long with a 3/32" hole drilled into it. Into the hole, I hammered in a 3/32" spring pin. Looks like this.
.
.
.
[ATTACH]4870[/ATTACH]
.
.
.
You place the tool up inside with headstock an position the spring pin so that it is in the access hole. Next, you take a piece of 2x4 that has a slight wedge shape cut into into it along with a relief and place it behind the drill rod.
.
.
.
[ATTACH]4871[/ATTACH]. . . [ATTACH]4872[/ATTACH]
.
.
.
From here, you just strike against the butt end of the 2x4 and the wedge does the work for you. It drives the U-screw out far enough where you can then grab it with a pair of vice grips and pull it out. It's shown in the next post. (I hit the max of 5 images in 1 post.)
Click here to proceed to next post
.
.
.
[ATTACH]4869[/ATTACH]
.
.
.
Mine only had one on the top and a machine screw on the bottom. Somewhere in it's genealogy, a previous owner felt the need to have access into the headstock so they drilled and tapped a hole for the screw.
The U-drive screws can be a challenge to remove since the head is a round head with no slot or cross recess (aka phillips) drive. To get them out, you need to either drill them out OR push them out from the inside if there is an access hole behind it. In my case, there is a 1/8" diameter access hole as seen in this photo looking UP into the headstock.
.
.
.
[ATTACH]4868[/ATTACH]
.
.
.
Since there is no room up inside the headstock to get a swing, most people probably grind a flat on the head and drill the head off then push it through. This can be a chore and a drill killer since the screw is hardened.
I made a tool where I could go up inside the headstock and push the U-drive screw out with a wedge. The tool is a 3/8" piece of drill rod at least a foot long with a 3/32" hole drilled into it. Into the hole, I hammered in a 3/32" spring pin. Looks like this.
.
.
.
[ATTACH]4870[/ATTACH]
.
.
.
You place the tool up inside with headstock an position the spring pin so that it is in the access hole. Next, you take a piece of 2x4 that has a slight wedge shape cut into into it along with a relief and place it behind the drill rod.
.
.
.
[ATTACH]4871[/ATTACH]. . . [ATTACH]4872[/ATTACH]
.
.
.
From here, you just strike against the butt end of the 2x4 and the wedge does the work for you. It drives the U-screw out far enough where you can then grab it with a pair of vice grips and pull it out. It's shown in the next post. (I hit the max of 5 images in 1 post.)
Click here to proceed to next post
- Attachments
-
- Img_6081mod.jpg (65.03 KiB) Viewed 7528 times
-
- Img_5345mod1.jpg (8.89 KiB) Viewed 7524 times
-
- Img_6082mod.jpg (22.39 KiB) Viewed 7527 times
-
- Img_6083mod.jpg (30.05 KiB) Viewed 7527 times
-
- Img_6085mod.jpg (25.57 KiB) Viewed 7519 times
Mike
Sunny San Diego
Sunny San Diego