Page 5 of 7
Re: The wisdom of the masses
Posted: Wed Feb 06, 2019 2:26 pm
by thunderbirdbat
The hole on the out feed table is for the blade guard when rabbetting with the jointer. The two holes on the jointer fence are for attaching an auxiliary fence to it. A copy of the manual can be found by going to the "Shopsmith Large Format Drawings, Illustrations and More" sticky note at the top of this section, then to the link "My Google Drive".
Re: The wisdom of the masses
Posted: Thu Feb 07, 2019 3:16 pm
by farmerwd
Thanks!
The problem I'm running into specifically, is that the docs in drive (
https://drive.google.com/drive/folders/ ... RuBhsXlCKy) are a bit vague on the way the actual way the fence is mounted to the table. They mentioned mounting studs, but I'm not sure what those look like in the exploded view or in real life.
I have the jointer assembled with the fence sitting on the table, and the quadrant mounted neatly to the standoffs. but the end opposite the quadrant is just sliding back and forth.
Sorry if I'm being daft here, new to the whole thing

Re: The wisdom of the masses
Posted: Thu Feb 07, 2019 3:32 pm
by BuckeyeDennis
farmerwd wrote:Thanks!
The problem I'm running into specifically, is that the docs in drive (
https://drive.google.com/drive/folders/ ... RuBhsXlCKy) are a bit vague on the way the actual way the fence is mounted to the table. They mentioned mounting studs, but I'm not sure what those look like in the exploded view or in real life.
I have the jointer assembled with the fence sitting on the table, and the quadrant mounted neatly to the standoffs. but the end opposite the quadrant is just sliding back and forth.
Sorry if I'm being daft here, new to the whole thing
The far end of the fence indeed does
not mount to the table. But the designer got so clever with the fence-locking handle that it often baffles new owners.
The handle is basically a double-sided socket wrench. Push it inward, and it engages one locking nut. Pull it out, and it engages a different locking nut. One of them locks the tilt angle of the fence, and the other locks the quadrant to that rectangular bar. I always forget which is which myself.
Try locking both of them, and see if that solves your problem.
Re: The wisdom of the masses
Posted: Thu Feb 07, 2019 3:47 pm
by farmerwd
Thanks! I'll give it a try!
Re: The wisdom of the masses
Posted: Thu Feb 07, 2019 5:17 pm
by dusty
You mention the fact that the far end of the fence moves back and forth (indicating that it is NOT locked) but you do not mention tilt. If you have been able to tilt and lock the fence, you have found lock. The other becomes available when you pull on the lock handle.
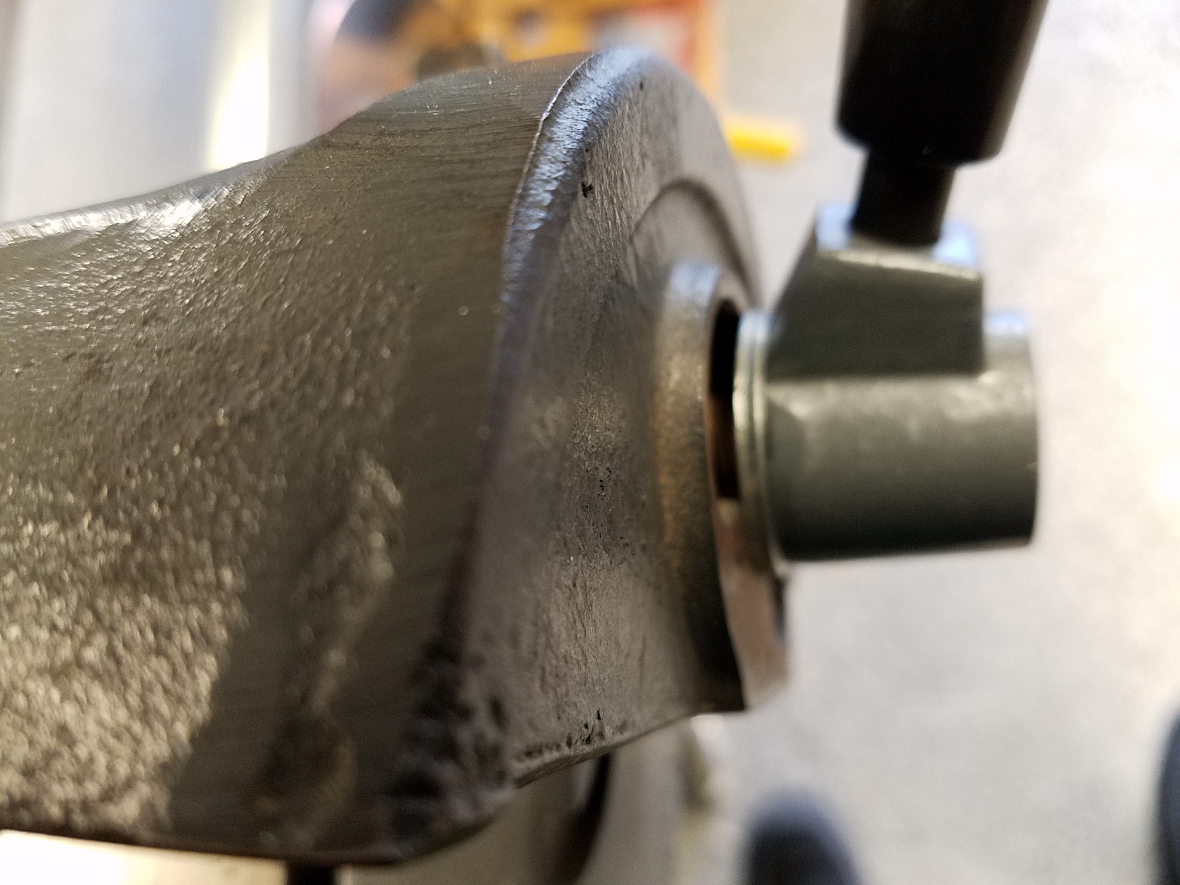
- Lock Handle Pushed In (Tilt)
- 20190207_150116.jpg (801.4 KiB) Viewed 12369 times

- Lock Handle Pulled Out (Left/Right) Fence Position
- 20190207_150130.jpg (748.4 KiB) Viewed 12369 times
With the handle as shown in the later image you should be able to lock the left/right movement of the fence. What you see in this image is the lock nut for fence tilt.
Re: The wisdom of the masses
Posted: Thu Feb 07, 2019 9:36 pm
by JPG
What you see in Dusty's two pix is the nut that locks the fence tilt angle. What you cannot see is the bolt that the handle engages when pulled out(as shown in the second pix). That bolt advances/retracts against a pin that presses against the rail and secures it laterally. If that pin is 'missing' it ain't gonna lock. The pin is simply a steel dowel.
Re: The wisdom of the masses
Posted: Fri Feb 08, 2019 6:03 pm
by BobCoates1953
My pin was missing also, just used a brass rod.
JPG wrote:What you see in Dusty's two pix is the nut that locks the fence tilt angle. What you cannot see is the bolt that the handle engages when pulled out(as shown in the second pix). That bolt advances/retracts against a pin that presses against the rail and secures it laterally. If that pin is 'missing' it ain't gonna lock. The pin is simply a steel dowel.
Re: The wisdom of the masses
Posted: Fri Feb 08, 2019 11:44 pm
by farmerwd
Well how clever is that!
My pin was in there, just gunked pretty well, so after some scrubbing and a bit of bar keepers friend, it's shiny and slick again! I put a touch of graphite on there and squared it with the table! The more I learn the more impressed with the details I am.
Thanks so much everyone, I got carried away and have dissambled and started to clean the entire jointer so it should be running like me again very soon! Just need to make/order/3d print done push blocks for it now.
Re: The wisdom of the masses
Posted: Sat Feb 09, 2019 12:47 am
by wa2crk
Whoopie!! Glad you got it squared away. Been following this thread from the beginning but refrained from posting cuz you had all the good mechanics fully engaged. Now, for storage of the things like the lathe centers and other smaller parts consider using pill bottles from the local drug store. You know, the little yellow ones. They are almost air tight and will keep the parts from rusting. Please consider posting your location. We like to know where our friends live. Larger craft tubes should be available at Hobby Lobby or on the net and can be used for the drill chuck and the saw blade arbors. As for the jointer, make note of the sequence of the washers and spacers used under the infeed table. They have to be in the correct order on reassembly.
Regards
Bill V
Re: The wisdom of the masses
Posted: Sat Feb 09, 2019 12:56 am
by JPG
A word of caution when securing the fence laterally(now that it works

). Do not do a gorilla impersonation when tightening the lateral clamp. The open slide back on the fence will open up with too much clamping force.