
More progress has been made. The ceramic guide blocks arrived as did a cheap blade. That should mean I'll be up and working in no time.
I've got the bearings aligned except for the top set. I need to get them set back just a small amount and will work on that adjustment. I also noticed an issue.
********************************
Now here is where I need some help:
How much play should I expect in the upper blade guard? My other band saw has "none". (I'm sorry to say I still don't have a manual so it could be I just don't know how to tighten things up.)
When looking at the blade the front to back is fine, the left to right movement is 1/8"+ with the guard down to with in a 1/4" table. The alignment was way off so I did that fix using the hex mounting bolts, but as I was playing with it I found I could also pull on the guard and get it out of alignment do to the slop.
*********************************
Will do a under power test tomorrow then if it looks OK I add the guide blocks and give it a saw.
Ed
Modification Bandsaw (Cast Iron table version)
Moderators: HopefulSSer, admin
Ed,reible wrote:More progress has been made. The ceramic guide blocks arrived as did a cheap blade. That should mean I'll be up and working in no time.
********************************
Now here is where I need some help:
How much play should I expect in the upper blade guard? My other band saw has "none". (I'm sorry to say I still don't have a manual so it could be I just don't know how to tighten things up.)
When looking at the blade the front to back is fine, the left to right movement is 1/8"+ with the guard down to with in a 1/4" table. The alignment was way off so I did that fix using the hex mounting bolts, but as I was playing with it I found I could also pull on the guard and get it out of alignment do to the slop.
*********************************
Ed
Does your bandsaw GUIDE COLUMN BRACKET #502549 have a nylon bolt on the left side perpendicular and behind the the two hex bolts? The older saws did not have this bolt, but the casting allows you to drill and tap for either a 1/4 or 5/16 nylon bolt. SS has the new part and I think they use a 1/4x20 bolt. When I work on one I make this change as it makes for much less side play in the BLADE GUIDE COLUMN POST and aids in alignment. I don't think the part is too expensive from SS, but it is easy to modify the old bracket when you have it all apart.
ldh
Hi,
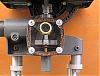
I don't see any nylon bolt. Here is a picture of what mine looks like in that area.
[ATTACH]13795[/ATTACH]
So can you give me the low down on that modification. I have no problems drilling and taping as long as I know where it should happen. Pictures work or a simple sketch, photo mark-up????
Tried to look at the exploded parts diagram, I do see the nylon bolt (#65)(517908) but not where it goes.
Thanks for the information, I would like to get this upgrade done too.
Ed
ldh wrote:Ed,
Does your bandsaw GUIDE COLUMN BRACKET #502549 have a nylon bolt on the left side perpendicular and behind the the two hex bolts? The older saws did not have this bolt, but the casting allows you to drill and tap for either a 1/4 or 5/16 nylon bolt. SS has the new part and I think they use a 1/4x20 bolt. When I work on one I make this change as it makes for much less side play in the BLADE GUIDE COLUMN POST and aids in alignment. I don't think the part is too expensive from SS, but it is easy to modify the old bracket when you have it all apart.
ldh
- Attachments
-
- DSCF1607sc.jpg (66.62 KiB) Viewed 8413 times
{Knight of the Shopsmith} [Hero's don't wear capes, they wear dog tags]
Ed,
I see yours is the old style without the nylon bolt. I checked with SS and they are out of the new brackets so you will have to modify the one you have. I have a couple of saws here in my CO shop that I modified and the one I took a pic of one I used a 1/4x20 bolt about an inch long as I recall. Simple fix and it takes care of the side play. My camera is not working well so hope this helps.
ldh
[ATTACH]13796[/ATTACH]
- Attachments
-
- GuideBracket.JPG (91.79 KiB) Viewed 8399 times
-
bobgroh
- Gold Member
- Posts: 400
- Joined: Sun Jun 29, 2008 1:12 pm
- Location: Just east of Kansas City, Missouri
Hey, I would also like to see a bit more on the modified part. I do have the older version of the bandsaw and I do have some play in guide bar so this sounds like a good mod to make. I took a look at the 'parts explosion' in the manual and I am guess that we are talking about drilling and tapping a hole in #57 on the diagram (SS PN 502549 Guide Column Bracket) for a nylon screw. The screw will then bear up against the Blade Guide Column (#58 on the diagram).
Assuming this is correct?
Picture was a great help by the way.
Assuming this is correct?
Picture was a great help by the way.
Bob Groh
Blue Springs, Missouri (just east of Kansas City, MO)
--------------------------------------------
1984 SS Mark V updated to model 510
1994 SS Mark V updated to model 520
SS SPT's: Bandsaw
Other tools:routers, Bosch router table, Craftsman 6" jointer, Steel City 12" bench planer, Porter Cable 7" power saw, and too much other stuff (not really - just kidding!!)
Bob,bobgroh wrote:Hey, I would also like to see a bit more on the modified part. I do have the older version of the bandsaw and I do have some play in guide bar so this sounds like a good mod to make. I took a look at the 'parts explosion' in the manual and I am guess that we are talking about drilling and tapping a hole in #57 on the diagram (SS PN 502549 Guide Column Bracket) for a nylon screw. The screw will then bear up against the Blade Guide Column (#58 on the diagram).
Assuming this is correct?
Picture was a great help by the way.
The bracket on the right has been modified. I have used both 1/4 and 5/16 bolts. The one shown is 1/4x20. An easy fix and well worth the time.
ldh
[ATTACH]13797[/ATTACH]
- Attachments
-
- GuideBracket2.JPG (69.16 KiB) Viewed 8394 times
Didn't get as far today as I would have liked. My son is building a deck and they want it finished for a party, Granddaughter turned 1 today but the party is Sunday. So I've been spend some extra hours on that this week, and today we finished about 8:30...
Took the saw apart so I could do the drilling and tapping for the nylon bolt. The drilling/tapping went fine but if I were to do it again I use a slightly larger tap drill then a #7 to make the tapping easier (1/4 - 20).
The only nylon bolt I had was 1" long, that happens to be a little to short, yes another hardware store trip in the future. What happens is the head hits on the casting boss, since it is nylon it flexes but a 1/2" longer and it would be back far enough so it would not interfere.
I have a good feeling about this modification, it seems like the right thing to do so I hope to get things back together and test it out.
Here is a couple of pictures, just in case you wanted to see the modification.
[ATTACH]13798[/ATTACH]
[ATTACH]13799[/ATTACH]
Ed
- Attachments
-
- DSCF1609sc.jpg (56.25 KiB) Viewed 8371 times
-
- DSCF1612sc.jpg (46.67 KiB) Viewed 8368 times
{Knight of the Shopsmith} [Hero's don't wear capes, they wear dog tags]
-
paulmcohen
- Platinum Member
- Posts: 1577
- Joined: Fri Dec 08, 2006 8:10 pm
- Location: Beaverton, Oregon
- Contact:
ldh wrote:Ed,
Does your bandsaw GUIDE COLUMN BRACKET #502549 have a nylon bolt on the left side perpendicular and behind the the two hex bolts? The older saws did not have this bolt, but the casting allows you to drill and tap for either a 1/4 or 5/16 nylon bolt. SS has the new part and I think they use a 1/4x20 bolt. When I work on one I make this change as it makes for much less side play in the BLADE GUIDE COLUMN POST and aids in alignment. I don't think the part is too expensive from SS, but it is easy to modify the old bracket when you have it all apart.
ldh
What does this do my 1982 Bandsaw has one but I have never seen any instructions for adjusting it.
Paul Cohen
Beaverton, OR
A 1982 500 Shopsmith brand upgraded to a Mark 7 PowerPro, Jointer, Bandsaw (with Kreg fence), Strip Sander, Ring Master and lots of accessories all purchased new
12" Sliding Compound Mitre Saw, 1200 CFM DC
Beaverton, OR
A 1982 500 Shopsmith brand upgraded to a Mark 7 PowerPro, Jointer, Bandsaw (with Kreg fence), Strip Sander, Ring Master and lots of accessories all purchased new
12" Sliding Compound Mitre Saw, 1200 CFM DC
Paul,paulmcohen wrote:What does this do my 1982 Bandsaw has one but I have never seen any instructions for adjusting it.
the nylon bolt takes up the side play in the Guide Column Post. Just enough tension to remove the side play yet allow the post to move smoothly up and down. Did you buy your saw new in 82? I am not sure just when SS started putting the nylon bolt in. I am not sure just when I started adding the nylon bolt on the saws that I work on, but I know it is just one of the mods that help make the SS Bandsaw a great little tool.
ldh