The lady had been asking for a "table" to could cover our Ottoman so as to better support food and drink, mostly drink in my case
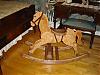
She had liked the stain result I had on these small accent tables and wished to mimic the look if possible.
- accent-tables.jpg (123.82 KiB) Viewed 4368 times
At this point-we had been in negotiation about exactly what this ottoman tabletop should be capable of doing. Of course-we negotiated ourselves into a project scope that exceeded our capabilities on a number of fronts. We didn't learn from project creep incurred by the tapered leg requirement
1. Table should cover the ottoman
2. Table should "look" like the accent table if possible
3. Table should be able to be split in two and used as separate TV trays on the couch
4. Table split line should be curved-because..well because straight is boring !
So naturally-we started with the table split line curve. The lady made a curve she liked on a 2x4 and cut it...she has a much steadier hand than I.
- cutting-the-curve.jpg (70.99 KiB) Viewed 4368 times
This worked reasonably well, but realized after cutting these curves, the 2 pieces didn't match up well-there were odd gaps in the curve. Further digging led me to understand the idea of complementary curves and correcting for this using a router and offset bearings to undo the error introduced by the kerf of the cutting itself.
- tabletop-curve1.jpg (86.03 KiB) Viewed 4368 times
- tabletop-curve2.jpg (73.68 KiB) Viewed 4368 times
The curved edges were difficult to work on both the adhesive step as well as the veneer cutting step as the veneer knife I had purchased was unable to follow the curve...so i made a narrow veneer blade jig to allow for the cutting. Some issues and cosmetic defects-but overall good enough for us.
- stain+veneer2.jpg (69.61 KiB) Viewed 4368 times
- unfinished leg fold.jpg (76.82 KiB) Viewed 4368 times
Placed over the ottoman with legs folded under-it simply rests on the ottoman surface.
- finsihed-ottoman.jpg (107 KiB) Viewed 4368 times
- finished-free-standing.jpg (108.94 KiB) Viewed 4368 times
- finshed-on-couch.jpg (111.89 KiB) Viewed 4368 times
- matchup to accent.jpg (100.37 KiB) Viewed 4368 times
A long project. I think I learned a few things along the way though.
b