You sir are an absolute star!!!
First a comprehensive overhaul of a scroll saw with pictures and now the belt sander.
Brilliant for all those who need to overhaul either second hand or old SPT's.
Thank you very much.
That is a hell of a long shopsmith.
I was thinking of something similar to turn long spindles or columns.
Mighty impressive.
Love to know how easy it was to find the tubing.
This was a very helpful and well prepared photo dissertation of the reassembly process of a reconditioned Magna Belt Sander. Thank you for the effort and the great photo images (all 32 shots, 3.90MB worth).
"Making Sawdust Safely" Dusty
Sent from my Dell XPS using Firefox.
h-bomb wrote:That is a hell of a long shopsmith.
I was thinking of something similar to turn long spindles or columns.
Mighty impressive.
Love to know how easy it was to find the tubing.
Very easy! However it is not heavy enough for what you intend. It is 1 1/2" EMT electrical conduit. I believe what I have in mind will work, but it will not have either way tubes nor a carriage and headstock. Now if you filled these tubes with concrete or grout and r-bar. . .
╔═══╗
╟JPG ╢
╚═══╝
Goldie(Bought New SN 377425)/4" jointer/6" beltsander/12" planer/stripsander/bandsaw/powerstation /Scroll saw/Jig saw /Craftsman 10" ras/Craftsman 6" thicknessplaner/ Dayton10"tablesaw(restoredfromneighborstrashpile)/ Mark VII restoration in 'progress'/ 10E[/size](SN E3779) restoration in progress, a 510 on the back burner and a growing pile of items to be eventually returned to useful life. - aka Red Grange
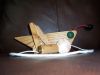
The carriage bolt passes through the slot in the back brace(the table pivot), through a square holed washer, the separator tube, a washer, the other table pivot(the front brace), the washer with pointer, and finally the lever nut. Make sure the washer with indicator seats properly into the brace slot before tightening.
[ATTACH]13405[/ATTACH]
The tension pin that the table pivots on is best driven out from the inside as the holes in the table are larger(clearance so as to pivot) than the holes in the table support.
[ATTACH]13407[/ATTACH]
The stud that the slotted braces pivots on is ribbed and has a shoulder under the head. It is driven loose from the edge of the table and when put back, is driven until it bottoms out on the shoulder. Make sure the degree scale side of the braces face out.(at least on the pointer side)
[ATTACH]13408[/ATTACH]
This shows the tension pin and stud from the edge of the table.
Attachments
TABLE LOCK.jpg (130.58 KiB) Viewed 10037 times
TABLE PIVOT PIN.jpg (99.85 KiB) Viewed 10033 times
BRACE PIVOT PIN.jpg (128.27 KiB) Viewed 10033 times
TABLE PINS.jpg (103.59 KiB) Viewed 10029 times
╔═══╗
╟JPG ╢
╚═══╝
Goldie(Bought New SN 377425)/4" jointer/6" beltsander/12" planer/stripsander/bandsaw/powerstation /Scroll saw/Jig saw /Craftsman 10" ras/Craftsman 6" thicknessplaner/ Dayton10"tablesaw(restoredfromneighborstrashpile)/ Mark VII restoration in 'progress'/ 10E[/size](SN E3779) restoration in progress, a 510 on the back burner and a growing pile of items to be eventually returned to useful life. - aka Red Grange
Thanks for that post. It did help. I have a worn belt on one side so it is very squirley. I did get through 2 hours of use this morning using the worn belt. 80 grit belts last forever!
I took my belt sander apart yesterday, not this far though!
I have had issues with it since I purchased it with tracking and adjusting the tracking. Since I am a newbie with belt sanders PERIOD, I just struggled through it and wondered if it were a shopsmith thing, or me?
Basically I found that the tension knob was out of adjustment. So I adjusted the tension, fine tuned a few other things, and it is working like a champ now. Belt slid on, adjusted in a minute, life is good.
My belt sander is a 84 model. It had a flat roller on it also. I don't think it had ever been apart, I don't think it had been used that much.
I also polished the base? plate that the belt rides over.
ddub wrote:
I also polished the base? plate that the belt rides over.
Did ya also wax that plate?
SS 500(09/1980), DC3300, jointer, bandsaw, belt sander, Strip Sander, drum sanders,molder, dado, biscuit joiner, universal lathe tool rest, Oneway talon chuck, router bits & chucks and a De Walt 735 planer,a #5,#6, block planes. ALL in a 100 square foot shop. .
.
Bob
Super job JPG!!!!!!!!!!!!!!! Since I have that Menards clone, as you said not to normal thinking, I pick up a SS book and tells all on it.
Measure once, cut as many times as needed to get it right! Bob
56/57 Greenie with jointer, 85 Mark V with band saw, 63 Goldie with jointer, 3 ER 10s, 1951 vintage, Hernia from the Er 10s, Tool Shop SS clone 6" jointer, and 6" belt sander, Delta 10" TS, Buffalo 6" jointer, Craftsman 12" BS, 10" Ryobi planer. Compound Miter, and misc.