I am adding this link to a previous thread so the reference to 'Rob' will make sense http://www.shopsmith.net/forums/showthread.htm?t=8172&highlight=reassembly
As Rob has pointed out, it is not completely disassembled, but further than most will take it down. This thread is intended to illustrate one method of putting it back together. I have attempted to identify and illustrate where potential problems reside. It is possible to assemble it incorrectly and become quite frustrated when it does not go together smoothly(see Nick's Sawdust Session!;)).
The unit illustrated is an early Shopsmith Inc. gray version with the older Magna castings. The stickers are original and were carefully removed then reattached after painting. There are two other differences between this unit and newer vintage, and those will be pointed out below. The new paint colors are my personal preference - gold and coppertone from Rustoleum(hammered).
[ATTACH]13358[/ATTACH]
Before reassembling. The table is not shown. I did not take pix of the table unassembled, but will take a couple showing the parts removed.
[ATTACH]13359[/ATTACH]
A word about the bearing cavities in the side castings. There is a spring clip in the bottom that is installed with the fingers facing the bearing(flat side to the bottom). That white stuff is lithium grease(both sides of the clip). It has been pointed out that SS CS says the reverse when asked. So flat side s/b against the bearing, and the fingers towards the bottom of the hole. Mine were the other way when I disassembled it???
THE BEARINGS ARE 5/8" x 35mm x 11mm shielded 6202-10-ZZ << Added 6-8-14
[ATTACH]13360[/ATTACH]
On the back side of both castings there are two clips on each that serve as sacrificial lambs when the belt tracks too close to either side. The hardened tinnerman clips will last longer than the softer aluminum casting.
[ATTACH]13361[/ATTACH]
I pried the originals off and replaced them with new clips.
[ATTACH]13362[/ATTACH]
The tracking adjustment knob and screw is inserted in the hole and pre-adjusted to about 1/2" thread sticking out the rear(that includes the knob thickness). More about that 1/2" later! See post #5. This is not critical since it can easily be adjusted even with a belt installed. Note the side of the tracking adjustment knob with the raised center faces towards the center.
Both this pix and the 'fixed' screw on the opposite side are shown with the roll pin sticking out towards the camera. This is not correct. The roll pins must be facing outward and ride in a groove in the casting. This will be shown later.
Reassembling a Belt Sander 6x48
Moderators: HopefulSSer, admin
-
JPG

- Platinum Member
- Posts: 34643
- Joined: Wed Dec 10, 2008 7:42 pm
- Location: Lexington, Ky (TAMECAT territory)
Reassembling a Belt Sander 6x48
- Attachments
-
- exploded.jpg (162.42 KiB) Viewed 20078 times
-
- bearing cavity.jpg (136.79 KiB) Viewed 20045 times
-
- clip b4.jpg (121.41 KiB) Viewed 20046 times
-
- new clip.jpg (86.91 KiB) Viewed 20040 times
-
- adjuster.jpg (135.01 KiB) Viewed 20045 times
╔═══╗
╟JPG ╢
╚═══╝
Goldie(Bought New SN 377425)/4" jointer/6" beltsander/12" planer/stripsander/bandsaw/powerstation /Scroll saw/Jig saw /Craftsman 10" ras/Craftsman 6" thicknessplaner/ Dayton10"tablesaw(restoredfromneighborstrashpile)/ Mark VII restoration in 'progress'/ 10E[/size](SN E3779) restoration in progress, a 510 on the back burner and a growing pile of items to be eventually returned to useful life. - aka Red Grange
-
JPG
- Platinum Member
- Posts: 34643
- Joined: Wed Dec 10, 2008 7:42 pm
- Location: Lexington, Ky (TAMECAT territory)
Belt Sander Reassembly 2
[ATTACH]13368[/ATTACH]
The other side has a fixed(but still adjustable with the belt off) tracking screw and it also should be installed with 1/2" exposed threads towards the rear. The tinnerman clip removed is 1/2" wide so it is a good gauge. More about that 1/2" later See post #5
[ATTACH]13369[/ATTACH]
The 'knob' end of the idler drum has two or three parts to put back on. The large flat washer goes on first. Then on newer versions, a curved washer followed finally by the 'guide bushing'. The idler drum was cleaned out of old original grease and replaced with lithium grease. Not easy to do, but the ends will pull out(under spring tension) and provide access to the grease and each end of the shaft where the bearing bushings contact the shaft. Need extra hands or vise to do that.!
[ATTACH]13370[/ATTACH]
A word about the 'guide bushing'. Notice it is not square, but rectangular. The long side runs front to rear. Only the shorter sides will fit into the slots they ride in.
[ATTACH]13371[/ATTACH]
As promised a pix showing the fixed tracking screw roll pin properly inserted with the roll pin facing out into its groove.
[ATTACH]13372[/ATTACH]
Finally the idler drum etc. installed in the casting. Notice the tracking screw is inside of the large flat washer so as to properly contact the tension cam. The guide bushing is riding in its slot and the tension pin is in its groove.
- Attachments
-
- tother side clip.jpg (132.37 KiB) Viewed 20049 times
-
- idler shaft.jpg (83.54 KiB) Viewed 20032 times
-
- short long.jpg (116.54 KiB) Viewed 20025 times
-
- fixed tension stop.jpg (128.38 KiB) Viewed 20025 times
-
- idler set inplace.jpg (128.76 KiB) Viewed 20018 times
╔═══╗
╟JPG ╢
╚═══╝
Goldie(Bought New SN 377425)/4" jointer/6" beltsander/12" planer/stripsander/bandsaw/powerstation /Scroll saw/Jig saw /Craftsman 10" ras/Craftsman 6" thicknessplaner/ Dayton10"tablesaw(restoredfromneighborstrashpile)/ Mark VII restoration in 'progress'/ 10E[/size](SN E3779) restoration in progress, a 510 on the back burner and a growing pile of items to be eventually returned to useful life. - aka Red Grange
╟JPG ╢
╚═══╝
Goldie(Bought New SN 377425)/4" jointer/6" beltsander/12" planer/stripsander/bandsaw/powerstation /Scroll saw/Jig saw /Craftsman 10" ras/Craftsman 6" thicknessplaner/ Dayton10"tablesaw(restoredfromneighborstrashpile)/ Mark VII restoration in 'progress'/ 10E[/size](SN E3779) restoration in progress, a 510 on the back burner and a growing pile of items to be eventually returned to useful life. - aka Red Grange
-
JPG
- Platinum Member
- Posts: 34643
- Joined: Wed Dec 10, 2008 7:42 pm
- Location: Lexington, Ky (TAMECAT territory)
Belt Sander Reassembly 3
Not shown, but the drive drum bearing was never removed from the non-adjustable side casting we have been working with.(see 1st pix post #1). With that casting positioned so that the both drums(the drive drum is also inserted into its bearing) face up, we will now address the 'other' end of the idler drum.
[attach]13373[/attach]
Insert both spacers in their bores and position the guide bushing so that the long sides run front to rear(so it will fit into the slot in the second casting).
[attach]13374[/attach]
After sliding the casting onto the drive drum shaft and the two spacers and the guide bushing, the idler shaft etc. should look like this.(Yes all that at once is a bit of a challenge, but perseverance will get it done) Notice the tracking screw roll pin, the tracking screw end and the guide bushing are all in the proper place.(Just like the other side).
[attach]13375[/attach]
If the bolt is held vertical over the square hole in the casting and the assembly is positioned correctly, the bolt will drop straight down into the hole on the opposite casting.
[attach]13376[/attach]
Pretty obvious, but the lock washer goes on first followed by the nut. At this time only finger tighten the two nuts.
- Attachments
-
- idler tother side.jpg (112.57 KiB) Viewed 20009 times
-
- cover2 idler end.jpg (93.6 KiB) Viewed 20003 times
-
- drop bolt.jpg (142.97 KiB) Viewed 20008 times
-
- obvious bolt washer nut.jpg (118.27 KiB) Viewed 20006 times
╔═══╗
╟JPG ╢
╚═══╝
Goldie(Bought New SN 377425)/4" jointer/6" beltsander/12" planer/stripsander/bandsaw/powerstation /Scroll saw/Jig saw /Craftsman 10" ras/Craftsman 6" thicknessplaner/ Dayton10"tablesaw(restoredfromneighborstrashpile)/ Mark VII restoration in 'progress'/ 10E[/size](SN E3779) restoration in progress, a 510 on the back burner and a growing pile of items to be eventually returned to useful life. - aka Red Grange
╟JPG ╢
╚═══╝
Goldie(Bought New SN 377425)/4" jointer/6" beltsander/12" planer/stripsander/bandsaw/powerstation /Scroll saw/Jig saw /Craftsman 10" ras/Craftsman 6" thicknessplaner/ Dayton10"tablesaw(restoredfromneighborstrashpile)/ Mark VII restoration in 'progress'/ 10E[/size](SN E3779) restoration in progress, a 510 on the back burner and a growing pile of items to be eventually returned to useful life. - aka Red Grange
-
JPG
- Platinum Member
- Posts: 34643
- Joined: Wed Dec 10, 2008 7:42 pm
- Location: Lexington, Ky (TAMECAT territory)
Belt Sander Reassembly 4
The tension release knob slips onto the idler drum shaft, but make sure the knob is oriented to the slot in the shaft.
The knob is retained onto the shaft by an external ring that fits into a shallow groove near the end of the shaft.
I think it a good idea to position the open end of the ring away from the open slot on the shaft.
This pix is of a newer version and shows the platen mounting tabs are raised above the side of the casting. This eliminates the need for the 12 spacer washers(shown below) used in this older version. Yes the rust indicates it resides in the 'todo' pile.
The older version has platen mounting tabs that are below the edge of the casting which requires the use of 2 thick spacing washers under each of the six platen mounting screws.
I did not take a pix of fastening the 6 platen screws. I only snugged them up at this time.
- snap ring b4.jpg (135.07 KiB) Viewed 19990 times
- snap ring installed.jpg (124.84 KiB) Viewed 19998 times
- new platen tab.jpg (63.58 KiB) Viewed 19978 times
- platen lip old.jpg (125.2 KiB) Viewed 19978 times
- platen spacers.jpg (66.44 KiB) Viewed 19974 times
Last edited by JPG on Sun May 01, 2016 12:47 pm, edited 1 time in total.
╔═══╗
╟JPG ╢
╚═══╝
Goldie(Bought New SN 377425)/4" jointer/6" beltsander/12" planer/stripsander/bandsaw/powerstation /Scroll saw/Jig saw /Craftsman 10" ras/Craftsman 6" thicknessplaner/ Dayton10"tablesaw(restoredfromneighborstrashpile)/ Mark VII restoration in 'progress'/ 10E[/size](SN E3779) restoration in progress, a 510 on the back burner and a growing pile of items to be eventually returned to useful life. - aka Red Grange
╟JPG ╢
╚═══╝
Goldie(Bought New SN 377425)/4" jointer/6" beltsander/12" planer/stripsander/bandsaw/powerstation /Scroll saw/Jig saw /Craftsman 10" ras/Craftsman 6" thicknessplaner/ Dayton10"tablesaw(restoredfromneighborstrashpile)/ Mark VII restoration in 'progress'/ 10E[/size](SN E3779) restoration in progress, a 510 on the back burner and a growing pile of items to be eventually returned to useful life. - aka Red Grange
-
JPG
- Platinum Member
- Posts: 34643
- Joined: Wed Dec 10, 2008 7:42 pm
- Location: Lexington, Ky (TAMECAT territory)
Belt Sander Reassembly 5
At this point I installed a belt and determined that the tracking screws needed to be closer to the rear(belt length will affect this) so I decided that 1/2" is NOT ENOUGH. So I changed it to slightly over 9/16". One of the 9/16" nuts will serve as a gauge this time. The tracking screw on the other side must be also changed.(accessible with the belt on)
[attach]13383[/attach]
With that change, the belt barely slips onto the drums.
[attach]13384[/attach]
The Medallion is a press fit onto the tension release knob. This is the original medallion after recreating the domed shape(it was pushed inward).
[attach]13385[/attach]
Moving to the back, notice the double d shaped hole for the trunion stud. The stud has two opposing flats on the threaded portion that fit into that hole. The trunion lock nut(the round one with ss tool kit holes) screws onto the stud from the outside. The washer is between the locknut and the side casting.
[attach]13386[/attach]
On the inside a flat washer, a 'cup' and a nylock nut hold the stud. Tighten the lock nut to at least the top of the nylon. Snug the trunion lock nut to keep things from moving.
- Attachments
-
- tension bolt 9 16.jpg (123.61 KiB) Viewed 19974 times
-
- medallion.jpg (127.21 KiB) Viewed 19967 times
-
- trunion bolt.jpg (120.82 KiB) Viewed 19958 times
-
- tronion bolt inside.jpg (145 KiB) Viewed 19966 times
╔═══╗
╟JPG ╢
╚═══╝
Goldie(Bought New SN 377425)/4" jointer/6" beltsander/12" planer/stripsander/bandsaw/powerstation /Scroll saw/Jig saw /Craftsman 10" ras/Craftsman 6" thicknessplaner/ Dayton10"tablesaw(restoredfromneighborstrashpile)/ Mark VII restoration in 'progress'/ 10E[/size](SN E3779) restoration in progress, a 510 on the back burner and a growing pile of items to be eventually returned to useful life. - aka Red Grange
╟JPG ╢
╚═══╝
Goldie(Bought New SN 377425)/4" jointer/6" beltsander/12" planer/stripsander/bandsaw/powerstation /Scroll saw/Jig saw /Craftsman 10" ras/Craftsman 6" thicknessplaner/ Dayton10"tablesaw(restoredfromneighborstrashpile)/ Mark VII restoration in 'progress'/ 10E[/size](SN E3779) restoration in progress, a 510 on the back burner and a growing pile of items to be eventually returned to useful life. - aka Red Grange
-
JPG
- Platinum Member
- Posts: 34643
- Joined: Wed Dec 10, 2008 7:42 pm
- Location: Lexington, Ky (TAMECAT territory)
Belt Sander Reassembly 6
[ATTACH]13387[/ATTACH]
Some consider this a mystery bolt. I think it serves a more positive locking action than the 'normal' one.
[ATTACH]13388[/ATTACH]
It must be removed and moved as the trunion is moved back and forth between horizontal and vertical.
[ATTACH]13389[/ATTACH]
After final tightening the two carriage bolts(resist the temptation to mimic a gorilla here. Just tight will do.
The hole plugs merely press into the holes in the casting.
Now would be a good time to securely tighten the platen screws. Really get on these, but do not let the screwdriver slip/cam out.
[ATTACH]13390[/ATTACH]
The shaft cover also just pushes into the hole in the casting. It can be on either side.
[ATTACH]13391[/ATTACH]
Finally the dust chute attaches with two screws, the hub goes on the shaft, and the mounting tubes go into holes in the base casting.
I messed up and did not get the last post 'posted'. I will recreate it below(post #9).
- Attachments
-
- mystery bolt a.jpg (143.91 KiB) Viewed 19959 times
-
- mystery bolt a inside.jpg (120.7 KiB) Viewed 19951 times
-
- hole plug a.jpg (144.96 KiB) Viewed 19957 times
-
- shaft cover.jpg (136.87 KiB) Viewed 19947 times
-
- dust chute tubes hub.jpg (105.77 KiB) Viewed 19953 times
╔═══╗
╟JPG ╢
╚═══╝
Goldie(Bought New SN 377425)/4" jointer/6" beltsander/12" planer/stripsander/bandsaw/powerstation /Scroll saw/Jig saw /Craftsman 10" ras/Craftsman 6" thicknessplaner/ Dayton10"tablesaw(restoredfromneighborstrashpile)/ Mark VII restoration in 'progress'/ 10E[/size](SN E3779) restoration in progress, a 510 on the back burner and a growing pile of items to be eventually returned to useful life. - aka Red Grange
╟JPG ╢
╚═══╝
Goldie(Bought New SN 377425)/4" jointer/6" beltsander/12" planer/stripsander/bandsaw/powerstation /Scroll saw/Jig saw /Craftsman 10" ras/Craftsman 6" thicknessplaner/ Dayton10"tablesaw(restoredfromneighborstrashpile)/ Mark VII restoration in 'progress'/ 10E[/size](SN E3779) restoration in progress, a 510 on the back burner and a growing pile of items to be eventually returned to useful life. - aka Red Grange
Belt Sander Drive Drum
The earlier belt sanders had a crown on the lower drive drum. I found that the later versions, the drive drum cross width is flat. The flat drive drum makes belt tracking less of a PITA. I have machined the earlier drive drums flat so that it helps set up the tracking quicker and keeps the sanding belt more centered without frequent adjustments. I find a new lower drum sleeve/cover helps as I have to remove the sleeve/cover before machining.
I would believe that everyone crowns the sanding belt when first installed otherwise the belt tracking is difficult to maintain.
I would believe that everyone crowns the sanding belt when first installed otherwise the belt tracking is difficult to maintain.
Bill Mayo bill.mayo@verizon.net
Shopsmith owner since 73. Sell, repair and rebuild Shopsmith, Total Shop & Wood Master headstocks, SPTs, attachments, accessories and parts. US Navy 1955-1975 (FTCS/E-8)
Shopsmith owner since 73. Sell, repair and rebuild Shopsmith, Total Shop & Wood Master headstocks, SPTs, attachments, accessories and parts. US Navy 1955-1975 (FTCS/E-8)
-
JPG
- Platinum Member
- Posts: 34643
- Joined: Wed Dec 10, 2008 7:42 pm
- Location: Lexington, Ky (TAMECAT territory)
I was surprised that the drive drum was flat. I have to assume that SS Inc. started the flat drum since this was an early ss Inc. version.billmayo wrote:The earlier belt sanders had a crown on the lower drive drum. I found that the later versions, the drive drum cross width is flat. The flat drive drum makes belt tracking less of a PITA. I have machined the earlier drive drums flat so that it helps set up the tracking quicker and keeps the sanding belt more centered without frequent adjustments. I find a new lower drum sleeve/cover helps as I have to remove the sleeve/cover before machining.
I would believe that everyone crowns the sanding belt when first installed otherwise the belt tracking is difficult to maintain.
It is possible however, that I 'flattened' it but I do not recall since I took this apart 2 yrs ago! How thick is the rubber? If too thin, then I did not!
╔═══╗
╟JPG ╢
╚═══╝
Goldie(Bought New SN 377425)/4" jointer/6" beltsander/12" planer/stripsander/bandsaw/powerstation /Scroll saw/Jig saw /Craftsman 10" ras/Craftsman 6" thicknessplaner/ Dayton10"tablesaw(restoredfromneighborstrashpile)/ Mark VII restoration in 'progress'/ 10E[/size](SN E3779) restoration in progress, a 510 on the back burner and a growing pile of items to be eventually returned to useful life. - aka Red Grange
╟JPG ╢
╚═══╝
Goldie(Bought New SN 377425)/4" jointer/6" beltsander/12" planer/stripsander/bandsaw/powerstation /Scroll saw/Jig saw /Craftsman 10" ras/Craftsman 6" thicknessplaner/ Dayton10"tablesaw(restoredfromneighborstrashpile)/ Mark VII restoration in 'progress'/ 10E[/size](SN E3779) restoration in progress, a 510 on the back burner and a growing pile of items to be eventually returned to useful life. - aka Red Grange
-
JPG
- Platinum Member
- Posts: 34643
- Joined: Wed Dec 10, 2008 7:42 pm
- Location: Lexington, Ky (TAMECAT territory)
Belt Sander Reassembly 7
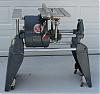
Time to stand tall!
[ATTACH]13397[/ATTACH]
[ATTACH]13398[/ATTACH]
[ATTACH]13399[/ATTACH]
[ATTACH]13400[/ATTACH]
I will post table pix after I take them! See post # 15
Sneak Preview!:D
[ATTACH]13401[/ATTACH]
[ATTACH]13397[/ATTACH]
[ATTACH]13398[/ATTACH]
[ATTACH]13399[/ATTACH]
[ATTACH]13400[/ATTACH]
I will post table pix after I take them! See post # 15
Sneak Preview!:D
[ATTACH]13401[/ATTACH]
- Attachments
-
- stand tall a.jpg (159.34 KiB) Viewed 19970 times
-
- stand tall b.jpg (137.88 KiB) Viewed 19972 times
-
- stand tall c.jpg (161.03 KiB) Viewed 19967 times
-
- stand tall d.jpg (138.81 KiB) Viewed 19963 times
-
- preview.jpg (168.32 KiB) Viewed 19965 times
╔═══╗
╟JPG ╢
╚═══╝
Goldie(Bought New SN 377425)/4" jointer/6" beltsander/12" planer/stripsander/bandsaw/powerstation /Scroll saw/Jig saw /Craftsman 10" ras/Craftsman 6" thicknessplaner/ Dayton10"tablesaw(restoredfromneighborstrashpile)/ Mark VII restoration in 'progress'/ 10E[/size](SN E3779) restoration in progress, a 510 on the back burner and a growing pile of items to be eventually returned to useful life. - aka Red Grange
╟JPG ╢
╚═══╝
Goldie(Bought New SN 377425)/4" jointer/6" beltsander/12" planer/stripsander/bandsaw/powerstation /Scroll saw/Jig saw /Craftsman 10" ras/Craftsman 6" thicknessplaner/ Dayton10"tablesaw(restoredfromneighborstrashpile)/ Mark VII restoration in 'progress'/ 10E[/size](SN E3779) restoration in progress, a 510 on the back burner and a growing pile of items to be eventually returned to useful life. - aka Red Grange

Huh?
Man, that's one bad a$$ belt sander! Then I see the last pic, and blew coffee out my nose!!!! That's the longest Shopsmith I have ever seen! I can't wait to see what you're up to!!! Cool sander, and nice resto! jimsjinx
If you are a part time band leader, does that make you a semi-conductor? Where do all the "unguided" bombs go?