Recently I was reading about a drill press sharpening station in an excellent article in ShopNotes 107, Sept/Oct 2009, seen here:
[ATTACH]12451[/ATTACH]
It can sharpen chisels, plane blades, etc. It occurred to me that we already have 90% of the ShopNotes machine in the form of our Shopsmith drill press mode. If you put sandpaper on the back of a steel sanding disk and arrange the tool guide bar at the right height above it, the geometry shown in the article would apply. Here is the sketch made using Excel as a quick drafting tool to figure out a few dimensions not given in the article:
[ATTACH]12454[/ATTACH]
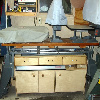
Coincidentally, a wood box was found at the local thrift shop that saved some effort and the guide bar support was mounted on top of it. You don't have to mount on a box; a piece of 3/4" plywood would work. The box was convenient to raise the device up to a nice work height on my setup. The ½” bar used came out of an old printer or copy machine and was hardened, so required a different way of holding it on the pivot arm than shown in the article. My guide bar pivot supports are 13.25” apart, inside dimension, making room for use of a 12" disk. After clamping the base box to the SS table, I used the SS quill extension to set the sanding disk at the correct 3/4” below the top of the guide bar and locked it there. I tried it out first using the 10” diameter charger plate based sanding disk mentioned here:
http://www.shopsmith.net/forums/showthr ... rger+plate
I chose to turn over the charger plate and remount it on the arbor, though I could have stuck a second sand paper disk on the back side of the charger plate. A tool clamp block and bevel gauge were made as shown in the article. It is set up on the dc motor powered dedicated SS drill press described here:
http://www.shopsmith.net/forums/showthr ... rill+press
That allows running slower than the 700 rpm of the SS, though with care not to overheat the tool being sharpened, you should still be able to use this idea on a “normal” SS. Charger plates at $4 or so, are cheap enough to allow having a selection of grits, or put the finer grit on the back of your steel sanding disk.
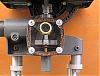
Here are pictures of the finished sharpening accessory on the Shopsmith.
[ATTACH]12452[/ATTACH]
[ATTACH]12453[/ATTACH]
Here is an old chisel about to be ground.
[ATTACH]12456[/ATTACH]
drill press tool sharpener
Moderators: HopefulSSer, admin
drill press tool sharpener
- Attachments
-
- sharp stn from mag.jpg (109.49 KiB) Viewed 18517 times
-
- sharpener.JPG (88.62 KiB) Viewed 18257 times
-
- sharpener two.JPG (76.62 KiB) Viewed 18285 times
-
- sharpener dimensions.jpg (72.8 KiB) Viewed 18230 times
-
- chisel in posn.jpg (59.9 KiB) Viewed 18211 times
Peter
a 510,a Mini, dedicated SS drillpress, SS spt's, home made SS belt grinder, SS piston air system, Southbend 10k lathe, mill/drill, Taig
a 510,a Mini, dedicated SS drillpress, SS spt's, home made SS belt grinder, SS piston air system, Southbend 10k lathe, mill/drill, Taig
The drill press sharpening station seems to work well. Here are a few more pictures:
[ATTACH]12458[/ATTACH]
[ATTACH]12457[/ATTACH]
Note that the distance of the guide bar from the vertical centerline of the Shopsmith is not too critical, but the 3/4" dimension of the top of the guide bar down to the sandpaper is. You should grind on the left side of center.
[ATTACH]12458[/ATTACH]
[ATTACH]12457[/ATTACH]
Note that the distance of the guide bar from the vertical centerline of the Shopsmith is not too critical, but the 3/4" dimension of the top of the guide bar down to the sandpaper is.
- Attachments
-
- good edge.jpg (86.28 KiB) Viewed 18440 times
-
- edge view.JPG (76.74 KiB) Viewed 18255 times
Peter
a 510,a Mini, dedicated SS drillpress, SS spt's, home made SS belt grinder, SS piston air system, Southbend 10k lathe, mill/drill, Taig
a 510,a Mini, dedicated SS drillpress, SS spt's, home made SS belt grinder, SS piston air system, Southbend 10k lathe, mill/drill, Taig

-
JPG

- Platinum Member
- Posts: 34642
- Joined: Wed Dec 10, 2008 7:42 pm
- Location: Lexington, Ky (TAMECAT territory)
Please explain the reason for the pivot.
To allow changing the disk??????
To allow changing the disk??????
╔═══╗
╟JPG ╢
╚═══╝
Goldie(Bought New SN 377425)/4" jointer/6" beltsander/12" planer/stripsander/bandsaw/powerstation /Scroll saw/Jig saw /Craftsman 10" ras/Craftsman 6" thicknessplaner/ Dayton10"tablesaw(restoredfromneighborstrashpile)/ Mark VII restoration in 'progress'/ 10E[/size](SN E3779) restoration in progress, a 510 on the back burner and a growing pile of items to be eventually returned to useful life. - aka Red Grange
Great concept
Now I have to build one of these BUT I have a mark VII. So do I do it this way or should I turn the head stock in the inverse position? Then use the "normal side" of the sanding disk. Which is also due to my having the cast aluminum disk that is ribbed on the back. Although maybe I'm going off the tool building deep end? What a way to go.
Ed
Ed
Thanks for the comments.
Regarding the pivot, in the original article, exactly so, for changing a sandpaper platter. I kept the pivot, partly because it was easier than changing the design, and I thought being able to pivot the guide bar out of the way without moving the base might turn out to be useful.
Regarding the pivot, in the original article, exactly so, for changing a sandpaper platter. I kept the pivot, partly because it was easier than changing the design, and I thought being able to pivot the guide bar out of the way without moving the base might turn out to be useful.
Peter
a 510,a Mini, dedicated SS drillpress, SS spt's, home made SS belt grinder, SS piston air system, Southbend 10k lathe, mill/drill, Taig
a 510,a Mini, dedicated SS drillpress, SS spt's, home made SS belt grinder, SS piston air system, Southbend 10k lathe, mill/drill, Taig
-
JPG
- Platinum Member
- Posts: 34642
- Joined: Wed Dec 10, 2008 7:42 pm
- Location: Lexington, Ky (TAMECAT territory)
e.friedl wrote:Now I have to build one of these BUT I have a mark VII. So do I do it this way or should I turn the head stock in the inverse position? Then use the "normal side" of the sanding disk. Which is also due to my having the cast aluminum disk that is ribbed on the back. Although maybe I'm going off the tool building deep end? What a way to go.
Ed
Mount the disk 'upside down'.
BTW I believe the backside is tapered(conical).
However flipped headstock might be better since that is possible!
╔═══╗
╟JPG ╢
╚═══╝
Goldie(Bought New SN 377425)/4" jointer/6" beltsander/12" planer/stripsander/bandsaw/powerstation /Scroll saw/Jig saw /Craftsman 10" ras/Craftsman 6" thicknessplaner/ Dayton10"tablesaw(restoredfromneighborstrashpile)/ Mark VII restoration in 'progress'/ 10E[/size](SN E3779) restoration in progress, a 510 on the back burner and a growing pile of items to be eventually returned to useful life. - aka Red Grange
╟JPG ╢
╚═══╝
Goldie(Bought New SN 377425)/4" jointer/6" beltsander/12" planer/stripsander/bandsaw/powerstation /Scroll saw/Jig saw /Craftsman 10" ras/Craftsman 6" thicknessplaner/ Dayton10"tablesaw(restoredfromneighborstrashpile)/ Mark VII restoration in 'progress'/ 10E[/size](SN E3779) restoration in progress, a 510 on the back burner and a growing pile of items to be eventually returned to useful life. - aka Red Grange
Ed
If I had a Mark VII, I would flip it and clamp a guide bar support to drop down from the table on two sturdy arms, suspending the bar 3/4" above the sanding disk:
[ATTACH]12482[/ATTACH]
If I had a Mark VII, I would flip it and clamp a guide bar support to drop down from the table on two sturdy arms, suspending the bar 3/4" above the sanding disk:
[ATTACH]12482[/ATTACH]
- Attachments
-
- 7 option.jpg (53.31 KiB) Viewed 17296 times
Peter
a 510,a Mini, dedicated SS drillpress, SS spt's, home made SS belt grinder, SS piston air system, Southbend 10k lathe, mill/drill, Taig
a 510,a Mini, dedicated SS drillpress, SS spt's, home made SS belt grinder, SS piston air system, Southbend 10k lathe, mill/drill, Taig
Ed
If I had a Mark VII, I would flip it and clamp a guide bar support to drop down from the table on two sturdy arms, suspending the bar 3/4" above the sanding disk:
[ATTACH]12483[/ATTACH]
If I had a Mark VII, I would flip it and clamp a guide bar support to drop down from the table on two sturdy arms, suspending the bar 3/4" above the sanding disk:
[ATTACH]12483[/ATTACH]
- Attachments
-
- 7 option.jpg (45.01 KiB) Viewed 18227 times
Peter
a 510,a Mini, dedicated SS drillpress, SS spt's, home made SS belt grinder, SS piston air system, Southbend 10k lathe, mill/drill, Taig
a 510,a Mini, dedicated SS drillpress, SS spt's, home made SS belt grinder, SS piston air system, Southbend 10k lathe, mill/drill, Taig