Page 1 of 1
Mark V Headstock maintenance & repair
Posted: Sun Jun 24, 2018 3:19 pm
by DonalNewGuy
I was trying to do recommended maintenance on Mark V. After doing some cleaning & lubricating, the instructions said to install the sanding disk on the main spindle, turn the disk by hand and slowly turn the speed dial from "fast" to "slow."
I attempted to do so. It was very hard to turn the disk sander and suddenly, I heard a "snap" and small screw head fell on the floor.
I have since pulled the headstock, removed the motor and the speed control sheaves. I expected to find a broken screw or someplace with a missing screw. But, everything came apart as shown on youtube examples. Any ideas where the screw came from?
Re: Mark V Headstock maintenance & repair
Posted: Mon Jun 25, 2018 12:52 am
by JPG
Post a pix of that screw head.
Re: Mark V Headstock maintenance & repair
Posted: Wed Jun 27, 2018 11:00 am
by DonalNewGuy
I've been away from the computer for a few days. I didn't keep the screw. It was the just the head from a #6 pan head screw (I assume machine screw). Thanks.
Re: Mark V Headstock maintenance & repair
Posted: Wed Jun 27, 2018 12:00 pm
by algale
I can't think of anywhere in the drive train where there is a pan head screw. There are pan head screws holding the legs on the casting, and the casters on to the legs, but there's no reason for one of those to snap while turning a sanding disc or the speed control.
Was this a steel sanding disc (versus old aluminum)? I ask because the steel sanding discs are held onto the sanding disc arbor via machine screws, I think.
Re: Mark V Headstock maintenance & repair
Posted: Tue Jul 03, 2018 2:04 pm
by chapmanruss
The only screws with the description you gave that I can think of on the headstock are the ones holding the Speed Control Assembly on the headstock or the one holding the Wire Retaining Clip inside the headstock. You can remove the Speed Control Dial to see if it is one of them. To check the Wire Retaining Clip look through the access hole above the Speed Control Assembly to see if it is loose.
Re: Mark V Headstock maintenance & repair
Posted: Tue Jul 03, 2018 9:34 pm
by beeg
Look at the bare face of your sanding disk. You should see 4 screw heads in the center of the disk.
Re: Mark V Headstock maintenance & repair
Posted: Tue Jul 03, 2018 11:13 pm
by JPG
We DO all have a common understanding of what a "pan" head screw looks like?
Re: Mark V Headstock maintenance & repair
Posted: Tue Jul 17, 2018 3:03 pm
by DonalNewGuy
Sorry for the delay. I've been away.
I think the screw is # 48 on the exploded diagram (see page # 6 of the PDF - part # 448027). From the diagram, it looks like the same location as screw # 104 in the exploded diagram (part # 515616). I have that screw. It is the bottom screw (3/8 inch) in the attachment.
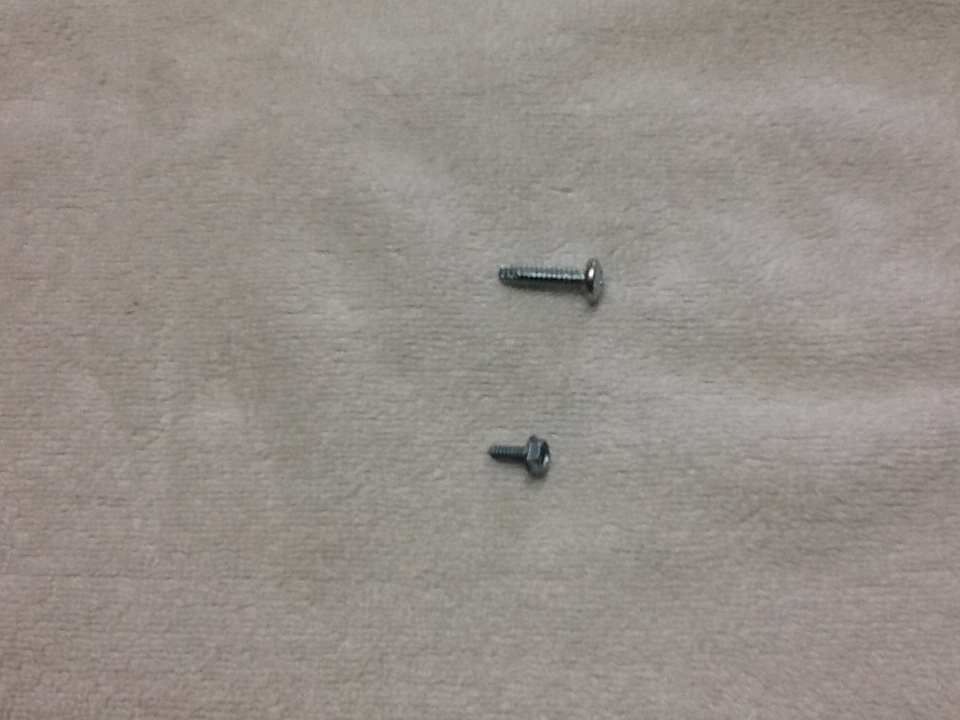
- screws.JPG (176.58 KiB) Viewed 7321 times
. The top screw (3/4 inch) appears to the "pan head" screw that I found the broken head. But, I can't figure out where it goes.
Screw # 104 is the one I removed from the eccentric bushing.

- eccentric bushing.JPG (177.84 KiB) Viewed 7321 times
If you can tell me where Screw # 48 goes, I'd appreciate it.
Thanks for all the help.
Re: Mark V Headstock maintenance & repair
Posted: Tue Jul 17, 2018 3:14 pm
by DonalNewGuy
Correction - the part # for screw # 104 is 515615.
Re: Mark V Headstock maintenance & repair
Posted: Tue Jul 17, 2018 10:13 pm
by JPG
#47 is a much larger screw(5/16-18??) that squeezes the headstock around the eccentric.
If there is a tapped hole immediately above the eccentric bore, that pictured screw goes there. I believe it also needs a flat washer. I will look at the explodes parts diagram an return with a "#".
OK, it is #48