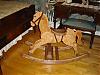
Here are my latest projects, requested by a bowling buddy of my dear wife. The original plans called for them to be 60" tall but after they were cut out, we decided that the legs weren't long enough. So that required making a couple more. I added 4" to the legs to give them more balance.
As usual, I did the cutting and lines, etc and dear wife did most of the painting. Hopefully the recipient will like them.
Now we will finish the original pair to use at our home.
I haven't been doing too much in the way of woodworking over the last year or so, so I guess I am somewhat responsible for the downward trend in actual projects being displayed or talked about. I certainly hope this forum does not go the way of the Do-Do bird as I have enjoyed and benefited from it for many years.
Have Fun!
John
Latest Projects - Standing Guard
Moderators: HopefulSSer, admin
Latest Projects - Standing Guard
- Attachments
-
- DSCN1008.JPG (123.72 KiB) Viewed 3257 times
John,
Very nice project. Is that their permanent location?
I think you got the leg length right.
Roy
Very nice project. Is that their permanent location?
I think you got the leg length right.
Roy
Roy
Mark V/510, Mark V/500 with parts for 510 upgrade, bandsaw, jointer, belt sander, DC3300 w/1 micron bag
Sawstop 3HP 36" PCS w/router table insert
Home designed and built CNC router, another CNC router desktop size
CNCed G0704 milling machine
Laser engraver
Way too much other stuff and not enough space")
Mark V/510, Mark V/500 with parts for 510 upgrade, bandsaw, jointer, belt sander, DC3300 w/1 micron bag
Sawstop 3HP 36" PCS w/router table insert
Home designed and built CNC router, another CNC router
CNCed G0704 milling machine
Laser engraver
Way too much other stuff and not enough space
-
JPG

- Platinum Member
- Posts: 34655
- Joined: Wed Dec 10, 2008 7:42 pm
- Location: Lexington, Ky (TAMECAT territory)
'dear wife' out did herself. Those really really look good!!!

╔═══╗
╟JPG ╢
╚═══╝
Goldie(Bought New SN 377425)/4" jointer/6" beltsander/12" planer/stripsander/bandsaw/powerstation /Scroll saw/Jig saw /Craftsman 10" ras/Craftsman 6" thicknessplaner/ Dayton10"tablesaw(restoredfromneighborstrashpile)/ Mark VII restoration in 'progress'/ 10E[/size](SN E3779) restoration in progress, a 510 on the back burner and a growing pile of items to be eventually returned to useful life. - aka Red Grange
-
rjent

- Platinum Member
- Posts: 2121
- Joined: Fri Mar 14, 2014 3:00 pm
- Location: Hot Springs, New Mexico
Outstanding!
The proportions are perfect!
Nicely done!
Dick
The proportions are perfect!
Nicely done!
Dick
Dick
1965 Mark VII S/N 407684
1951 10 ER S/N ER 44570 -- Reborn 9/16/14
1950 10 ER S/N ER 33479 Reborn July 2016
1950 10 ER S/N ER 39671
1951 jigsaw X 2
1951 !0 ER #3 in rebuild
500, Jointer, Bsaw, Bsander, Planer
2014 Mark 7 W/Lift assist - 14 4" Jointer - DC3300
And a plethora of small stuff .....
"The trouble with quotes on the Internet is that you can never know if they are genuine." - Benjamin Franklin

What kind of finish do you use so they will last in the elements?
They look awesome by the way, thanks for sharing!
They look awesome by the way, thanks for sharing!
The sickness is spreading:
Mark V greenie 1954
Mark V goldie 1962 (I think)
Mark V grey 1978
Shopsmith attachments: 2 Jig Saws, Bandsaw, Jointer, Planer. Shaper tooling, many adapters, arbors, etc.
50s vintage Craftsman table saw
50s vintage Craftsman band saw
Mark V greenie 1954
Mark V goldie 1962 (I think)
Mark V grey 1978
Shopsmith attachments: 2 Jig Saws, Bandsaw, Jointer, Planer. Shaper tooling, many adapters, arbors, etc.
50s vintage Craftsman table saw
50s vintage Craftsman band saw
-
Jack Wilson
- Gold Member
- Posts: 186
- Joined: Tue Jul 09, 2013 10:40 pm
- Location: Ponte Vedra, FL
First, thanks for the positive comments!
The picture was taken in front of my garage but I understand the person requesting the soldiers plans to mount them on either side of her garage door.
"Dear Wife" has taken over most of the painting on my outdoor and seasonal projects though I often have to give her a little advice, most of which she does not appreciate.
The finishing involves several processes.
For the flat project like this one, I use "select grade" 5/8" exterior plywood which has one good side. I fill all the holes or blemishes with wood filler and sand before any finish is applied.
Then a coat of alkyd or oil based primer is applied to both sides of the plywood panel. I finally learned to do this on the wood before cutting. This avoids going over all of the pattern again after the primer covers up the tracing lines. (Took me a long time to figure that one out).The edges are primed after cutting.
The back side is then given two coats of exterior latex enamel.
The pattern side is done with at least two coats of the appropriate colour in acrylic craft paint, including bringing the colour around the edges.
I then go over most of the lines with a fine tip permanent marker to highlight the various parts.
The finishing touch is at least two coats of exterior clear spray finish.
All my outdoor seasonal projects so far have lasted at least five years and with a little touch-up, as long as ten. Some of the summer ones that get more exposure to the weather last about three years before requiring touch-up or repairs.
Some of these look easy when looking at the pattern online or in a catalogue, but we are always surprised at how time consuming the project really is.
Now on to a couple of indoor lighted snowmen that another friend of my dear wife has requested.
John