Right now my scrap tubs are in places I can't access until it warms a bit. I do have a couple of pieces of ash that I set aside for a project like this, if I can remember that "special" spot I put them. I think it is only 2 pieces that will be long enough but it will be good to get at least 2 of them to play with.
I have a sharp DeWalt fire & rescue that I'm going to use to cut out a thin parting tool, if it is beat up enough when that is finished it could well be my extra thin parting tool... well I purchased it for that purpose but hate to waste the teeth until I do something with it first.
My plan will be trying to do the blank tomorrow but who knows what will really happen.
I'm also planning on regrinding an extra shopsmith skew in to a round edge one. That will have a lot of material to remove, have to see how that works out.
Ed
terrydowning wrote:I agree with you Ed. Lathe tools tend to be spendy and I support your decision to try making your own. I'm looking forward to the results. As for handles, just grab whatever cutoffs you have, drill the correct size hole for the stock and turn them to the desired shape. I mean, you have a lathe and some turning tools already. Epoxy the handle in place. I made a thin parting tool from a dull reciprocating saw blade. I used some plum stock for the handle and used a section of 3/4" copper pipe that has been in my shop as a ferule.
A reasonable productive afternoon. Other then dumping over my water that I was dipping the tools in and making a mess things went well.
I was able to finish this batch of tools san the handles.
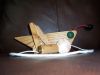
Here is the new ones that I did today.
[ATTACH]24386[/ATTACH]
The one that is on the top is done like yesterdays except for the back grind. The next two are triangle grinds, one at 45 degrees and one at 35 degrees. The triangle can be seen below.
[ATTACH]24387[/ATTACH]
This is the collect so far.
[ATTACH]24388[/ATTACH]
In case anyone is wondering about the green tape, it is a left over from how I did the triangles. Put the tape around the rod and marked where the ends meet. Take the tap off and divide the distance by three. Re-wrap the tape and use that to find where the flat will be ground by having that mark facing me. I use a one-two-three count then dip to keep things reasonably even. Seems to work. The second wrap helps keep the marked tape in place.
I was a little rushed on the last post, wife needed help cutting up the vegetables for supper. Now that it on the stove I figure I have a few more minutes to mention a few other things.
One of the nice features that comes with having a powerpro is having it run in either direction. The sharpener can then be mounted back where the strip sander is mounted just by selecting the the reverse button. You do have to remember to do that, I powered up and still had it running forward but at least it was easy to tell and I didn't wreck any belts or anything.
Next I wanted to mention that I did all of the shaping on the shopsmith rather then the grinding wheel. It might be a little slower but at least it has an easy adjustment of the angle.
Per the feed back I went with grits up to 150 only today.
One other interesting thing is that my hands have a sparkle now. The fine pieces of metal off the rod have the effect of having glitter on. Time to do a second washing with a brush this time.
Should you wish to get more involved in making your own turning tools, I think you will be interested in the steel rod types from McMaster-Carr (http://www.mcmaster.com/#standard-steel-rods/=r62l02). They don't have free shipping if your order is over $35 like Amazon but I think you will find a much better selection. I personally haven't used their steel rods for turning tools but I have used them for "spinning" tools (metal spinning).
________________________________________________________________________________________________
1981 Mark V 500, bandsaw, belt sander, jig saw, jointer; contractor's table saw; multiple circular saws and miter saws; and a trailer full of tools.
"It is better to remain silent and thought a fool than to speak out and remove all doubt"
Abraham Lincoln
I've ordered from Speedy Metals in the past. They have a large selection of different types of steel and shapes. And, they sell just about any length you might need.
Bud F.
1998 Mark V 510 bought used 2006, Jointer, 2 Bandsaws, ca 1960 Yuba SawSmith RAS
Projects and "stuff": http://www.bfulgham.com/JAlbum/Woodworking_Index/
We are going to use various vegetables this Sunday at my wood turners meeting. Using a Skew.
SS 500(09/1980), DC3300, jointer, bandsaw, belt sander, Strip Sander, drum sanders,molder, dado, biscuit joiner, universal lathe tool rest, Oneway talon chuck, router bits & chucks and a De Walt 735 planer,a #5,#6, block planes. ALL in a 100 square foot shop. .
.
Bob
My wife enjoyed the video but would let me try to peal any vegitables.... She is passing the link on to her friends, at least a few I'm sure will enjoy them too.
OK, today I started on some parting tools. Cap'n Eddie has posted these so I'm not going to repeat his efforts. I do have a few pictures so you can get an idea of what I did. And besides if there are no pictures then it didn't happen, right?
DeWalt has a blade for their saws-all, it is nice and thin that can be adapted to a parting tool. First you need to get rid of the teeth, look ma, no teeth....
[ATTACH]24408[/ATTACH]
I used a 4-1/2 angle grinder to take them off. It goes really fast!
[ATTACH]24409[/ATTACH]
I then took the paint off, used a wire brush rather then torch like Eddie mentioned. The paint comes off fine that way and you don't have to deal with heat issues.
[ATTACH]24410[/ATTACH]
It is pretty much ready for a handle now. Will put it aside until get to the handling portion of the project.
This next parting tool was a blade from a lawn edger in a past life. It is a bit thicker then the dewalt blade but still thinner then anything else I have. This was also a Capt'n Eddie project so again I'll not steal his thunder.
This need much reshaping so I used my bench grinder, could have done it differently but if it needs to change a new blade is only about $5.
In this case the finish was much tougher, so again I went with a wire brush but this time I went with this version. If you have one of these you know these require extra safety precautions.... still ended up with two wires stuck in my jeans.
[ATTACH]24411[/ATTACH]
I left the finish where the handle will be but did go to the bench grinder with wire wheel to touch things up a bit.
[ATTACH]24412[/ATTACH]
Again it is at the point of waiting for a handle.
In this shot you can see them together to get an idea of size.