
This is my latest development, first mentioned on my other thread:
http://www.shopsmith.net/forums/showthread.htm?t=4161
I was first contemplating how I could ever use some short cutoffs of way-tubes and bench tubes. In my web-browsing I found a fellow (Todd Cronkhite) on http://www.forums.woodnet.net who was close! He has made infilled bench planes from square steel tubing. So I'm not using my old way-tube cutoffs, but I'm off to an interesting project:
Scrap metals gathered & rough-cut:
[ATTACH]8888[/ATTACH]
Next installment, the Mouth is opened after a long long session with a Flat Bastard file. Angle was controlled with a wood "buck." Going very slow and deliberate so that the mouth will have a very tight opening:
[ATTACH]8887[/ATTACH]
Not an instant-gratification project, but so far very fun!
Shop-Made Infill Plane project
Moderators: HopefulSSer, admin
Shop-Made Infill Plane project
- Attachments
-
- Mouth Milled with Flat Bastard File.jpg (35.43 KiB) Viewed 8317 times
-
- Metal Plane Parts.jpg (39.43 KiB) Viewed 8366 times
Chris
Now some brass-work
I have used the Shopsmith to drill some pilot holes in the brass piece, and to manually feed some taps. Also used the disk-sander on the SS to clean up some of my hacksaw & file efforts on the brass lever-cap's lower ramp.
I also used the SS in horizontal boring mode (really my favorite) to put in the pivot-holes in the plane-body. The trial assembly is shown here. Using toilet bolts and common stuff wherever possible! Surely I'll need some more adjustments, but this is the general drift of things so far:
[ATTACH]8894[/ATTACH]
- Attachments
-
- Brass Shaping and Tapping.jpg (54.53 KiB) Viewed 8259 times
Chris
Function before Form
Well, I've not had a lot of time this week but I did get to try the Plane this morning. I wanted to stop and hone the big fat old antique blade, and make sure my eyeballed brass lever-cap was really going to hold the blade and let the shavings out.
So far pretty good!...
Here it is cutting butternut as slick as can be. Some burl Myrtle shavings are in the background. I don't necessarily think the finish is greatly better than with my Stanley, but it definitely stays on the job: The Stanely would pretty much hop along, but this one rides the cut all the way across the surface:
[ATTACH]8967[/ATTACH]
I feel OK enough now to go for some cosmetic cleanup, crafting some handgrips, etc.
- Attachments
-
- First Test Cuts.jpg (54.76 KiB) Viewed 8181 times
Chris
Getting Near the End !
Hi again,
I've made good progress. My infills are made of laminated Mesquite planks (reportedly the most dimensionally stable wood). I had fitted the inner-infills with plane-trimming, then later added more wood bits to complement the shape of the steel tubing.
I messed around for some time optimizing the grips for myself (a right-handed person). One photo here shows that I added a Cove for my right-hand's thumb. I had clamped the assembly together side-by-side with a 2x4 chunk, so I could make this Cove simply with a 1" Forstner bit at the Shopsmith (horizontal boring mode):
[ATTACH]9036[/ATTACH]
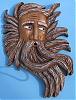
The other photo is my basic styling overall:
[ATTACH]9035[/ATTACH]
I have a bit of clean-up to do later, and will probably add some screws to better support the epoxied assembly.
Irony -- I thought my DC3300 had got slightly noisier lately. I opened up the impeller access, and found a lacy ribbon of wood -- from this plane on the butternut -- wrapped around the impeller. So: The excellent handplane cuts down on sawdust, but still clogs* the DC3300!
* I don't think this was any sort of major clog; it may have broken up on its own sooner or later.
I've made good progress. My infills are made of laminated Mesquite planks (reportedly the most dimensionally stable wood). I had fitted the inner-infills with plane-trimming, then later added more wood bits to complement the shape of the steel tubing.
I messed around for some time optimizing the grips for myself (a right-handed person). One photo here shows that I added a Cove for my right-hand's thumb. I had clamped the assembly together side-by-side with a 2x4 chunk, so I could make this Cove simply with a 1" Forstner bit at the Shopsmith (horizontal boring mode):
[ATTACH]9036[/ATTACH]
The other photo is my basic styling overall:
[ATTACH]9035[/ATTACH]
I have a bit of clean-up to do later, and will probably add some screws to better support the epoxied assembly.
Irony -- I thought my DC3300 had got slightly noisier lately. I opened up the impeller access, and found a lacy ribbon of wood -- from this plane on the butternut -- wrapped around the impeller. So: The excellent handplane cuts down on sawdust, but still clogs* the DC3300!
* I don't think this was any sort of major clog; it may have broken up on its own sooner or later.
- Attachments
-
- Plane Assembly.jpg (50.47 KiB) Viewed 8158 times
-
- Plane Rear Left Grip.jpg (56.9 KiB) Viewed 8183 times
Chris
Thanks for your kind words!
By the way, for some real eye-candy from true artisans, I like to look at the following:
http://www.billcarterwoodworkingplanema ... index.html
http://www.holteyplanes.com/
Wow!
By the way, for some real eye-candy from true artisans, I like to look at the following:
http://www.billcarterwoodworkingplanema ... index.html
http://www.holteyplanes.com/
Wow!
Chris
Help from the Shopsmith Help Kit
Hello,
I decided to add some lateral set-screws for the blade. Look familiar? . . .
[ATTACH]9216[/ATTACH]
I decided to add some lateral set-screws for the blade. Look familiar? . . .
[ATTACH]9216[/ATTACH]
- Attachments
-
- Using Shopsmith Help Kit.jpg (44.73 KiB) Viewed 7970 times
Chris
-
osx-addict
- Gold Member
- Posts: 386
- Joined: Thu Feb 28, 2008 1:56 pm
- Location: Los Angeles, CA
-
paulrussell

- Platinum Member
- Posts: 667
- Joined: Sun Apr 11, 2010 10:35 am
- Location: Dewitt MI