Still does with the two bearing quills!joshh wrote:It's doubtful someone else did the upgrade but who knows?
Unless someone else knows a trick to see if it's a 2 bearing, I think you will have to slide the quill out of the front of the headstock. If you are only replacing quill bearing(s) you don't have to tear the headstock apart that much.
Another thought, the plastic coupler where the rear of the quill mates with the drive assembly may be worn. On the single bearing quills, that's the only thing holding the rear of the quill shaft.
Time to rebuild, I guess
Moderators: HopefulSSer, admin
-
JPG

- Platinum Member
- Posts: 34642
- Joined: Wed Dec 10, 2008 7:42 pm
- Location: Lexington, Ky (TAMECAT territory)
╔═══╗
╟JPG ╢
╚═══╝
Goldie(Bought New SN 377425)/4" jointer/6" beltsander/12" planer/stripsander/bandsaw/powerstation /Scroll saw/Jig saw /Craftsman 10" ras/Craftsman 6" thicknessplaner/ Dayton10"tablesaw(restoredfromneighborstrashpile)/ Mark VII restoration in 'progress'/ 10E[/size](SN E3779) restoration in progress, a 510 on the back burner and a growing pile of items to be eventually returned to useful life. - aka Red Grange
-
joshh

- Platinum Member
- Posts: 723
- Joined: Tue Jan 08, 2013 8:53 pm
- Location: Dallas / Fort Worth, Texas
JPG40504 wrote:Still does with the two bearing quills!
I always forget that for some reason. Everytime I picture a 2 bearing quill apart, I see the MKC Tools version with the machined rear bearing. I guess that's because it's the first one I ever saw.
- 1986 Mark V 500 Mini
- 1985 Mark V 510 with reversible motor, bandsaw, jointer, and double-tilt.
I offer quality motor reversal, rebuilding, and rewiring. Contact me at HarbourTools@live.com
- 1985 Mark V 510 with reversible motor, bandsaw, jointer, and double-tilt.
I offer quality motor reversal, rebuilding, and rewiring. Contact me at HarbourTools@live.com
-
JPG
- Platinum Member
- Posts: 34642
- Joined: Wed Dec 10, 2008 7:42 pm
- Location: Lexington, Ky (TAMECAT territory)
My point was, that the coupler is always present except fer the '10'. It does reduce shaft freedom to 'wobble'.joshh wrote:I always forget that for some reason. Everytime I picture a 2 bearing quill apart, I see the MKC Tools version with the machined rear bearing. I guess that's because it's the first one I ever saw.
╔═══╗
╟JPG ╢
╚═══╝
Goldie(Bought New SN 377425)/4" jointer/6" beltsander/12" planer/stripsander/bandsaw/powerstation /Scroll saw/Jig saw /Craftsman 10" ras/Craftsman 6" thicknessplaner/ Dayton10"tablesaw(restoredfromneighborstrashpile)/ Mark VII restoration in 'progress'/ 10E[/size](SN E3779) restoration in progress, a 510 on the back burner and a growing pile of items to be eventually returned to useful life. - aka Red Grange
╟JPG ╢
╚═══╝
Goldie(Bought New SN 377425)/4" jointer/6" beltsander/12" planer/stripsander/bandsaw/powerstation /Scroll saw/Jig saw /Craftsman 10" ras/Craftsman 6" thicknessplaner/ Dayton10"tablesaw(restoredfromneighborstrashpile)/ Mark VII restoration in 'progress'/ 10E[/size](SN E3779) restoration in progress, a 510 on the back burner and a growing pile of items to be eventually returned to useful life. - aka Red Grange
-
freedomlives
- Gold Member
- Posts: 59
- Joined: Wed May 01, 2013 10:48 am
- Location: Slovakia
- Contact:
I looked up the instructions here on pulling the quill out. That was a lot less painful than I imagined-- less than 5 minutes, and half of that time was finding my circlip pliers!
I guess I've got the single bearing quill-- the shaft has a 6202Z/15.875C3 TPI TAIWAN bearing that feels quite worn out at the front, and right before the splines some circular piece of sheet metal is slid onto an area of the shaft that is machined down to .740 inches.
I've seen on the internet some people machining the single bearing shafts to receive a second bearing-- does anyone know what size bearing and what size the shaft is machined to? I figure the fastest, cheapest upgrade is to give the shaft to my father in law to take to work like he made me the 30mm saw arbor.
-
freedomlives
- Gold Member
- Posts: 59
- Joined: Wed May 01, 2013 10:48 am
- Location: Slovakia
- Contact:
For right now I'm just replacing that bearing, as I have had the replacement bearing since when I ordered bearings for the motor rebuild. There is some sort of rubbery/plastic residue in a groove cut into the shaft below where the bearing fits. Was there some sort of washer there originally, or is it just burned up old bearing grease? To put my question in another way, is all that should be slid on there the bearing on the single bearing shaft?
I have been using the same size and higher quality(ABEC3) bearing (35mm X 5/8" X 11mm) for the second bearing. I installed a 11mm spacer between the two bearings to provide better support for the shaft. The average machine shop cannot machine the quill housing and shaft to the precision tolerances needed. There equipment is normally too worn or lack of maintenance and they try to quickly do the job with a .002" to.010" off center error. It took me about 6 years and 5 different machine shops later to find a retired machinest with an outstanding shop in his back yard with top brand equipment that can do this machining to .0002" tolerance. Of course, I do not have any of these machined 2 bearing Poly-V quills available now, just sold the last one. I hope to have more available within the next month or two. I still have one 1985 one piece Shopsmith 2 bearing quill with new bearings installed that is available. Contact me off-line if interested. Thanks.freedomlives wrote:I looked up the instructions here on pulling the quill out. That was a lot less painful than I imagined-- less than 5 minutes, and half of that time was finding my circlip pliers!
I guess I've got the single bearing quill-- the shaft has a 6202Z/15.875C3 TPI TAIWAN bearing that feels quite worn out at the front, and right before the splines some circular piece of sheet metal is slid onto an area of the shaft that is machined down to .740 inches.
I've seen on the internet some people machining the single bearing shafts to receive a second bearing-- does anyone know what size bearing and what size the shaft is machined to? I figure the fastest, cheapest upgrade is to give the shaft to my father in law to take to work like he made me the 30mm saw arbor.
Bill Mayo bill.mayo@verizon.net
Shopsmith owner since 73. Sell, repair and rebuild Shopsmith, Total Shop & Wood Master headstocks, SPTs, attachments, accessories and parts. US Navy 1955-1975 (FTCS/E-8)
Shopsmith owner since 73. Sell, repair and rebuild Shopsmith, Total Shop & Wood Master headstocks, SPTs, attachments, accessories and parts. US Navy 1955-1975 (FTCS/E-8)
-
joshh
- Platinum Member
- Posts: 723
- Joined: Tue Jan 08, 2013 8:53 pm
- Location: Dallas / Fort Worth, Texas
http://youtu.be/2S7ICFrSttA
There is a video of Skip at MKC Tools doing the upgrade. He told me it provides the exact same setup as the 10ER quills saying they were much more precise than the mark V. He also has them for sale but if your dad can do it (with PRECISION) then free is always good.
If you get in touch with Skip, I'm sure he would gladly share the details for your own personal use. (Bearing size, machining depth, etc).
Here is his contact info:
Skip Campbell
skip@mkctools.com
817-319-2297
http://mkctools.com/mark%20v%20parts.htm
- 1986 Mark V 500 Mini
- 1985 Mark V 510 with reversible motor, bandsaw, jointer, and double-tilt.
I offer quality motor reversal, rebuilding, and rewiring. Contact me at HarbourTools@live.com
- 1985 Mark V 510 with reversible motor, bandsaw, jointer, and double-tilt.
I offer quality motor reversal, rebuilding, and rewiring. Contact me at HarbourTools@live.com
-
freedomlives
- Gold Member
- Posts: 59
- Joined: Wed May 01, 2013 10:48 am
- Location: Slovakia
- Contact:
Hmm... so I see now, I didn't realize the other end of the quill would need machining. My father-in-law works at an autoparts factory, so I assume the machines are good quality. The saw arbor was good, except that I just told him that the arbor needs to be for a 30mm blade without giving him a blade, so the arbor was exactly 30mm (maybe 30.02 according to my cheap, chinese, digital calipers, so I'm assuming he actually got it to be exactly 30.00mm), which is a problem because it actually needs to be a shade smaller than 30mm for the saw blade to slip on, which a small, square sharpening stone while the arbor rotated fixed.
So, I dunno... if I give him the bearings as well, I guess he could make it fit well.
What are the advantages/disadvantages of the two different approaches-- Skip puts his bearing next to the spline, and Bill extends the machined part next to the original bearing? What is the "one piece Shopsmith 2 bearing quill"?
If I can get my father in law to make it early this month, then I can see how it turns out, and if it isn't any good I could order a "professionally made" one in time to pick up when I'll be in the U.S. at the end of February...
-
joshh
- Platinum Member
- Posts: 723
- Joined: Tue Jan 08, 2013 8:53 pm
- Location: Dallas / Fort Worth, Texas
freedomlives wrote:What are the advantages/disadvantages of the two different approaches-- Skip puts his bearing next to the spline, and Bill extends the machined part next to the original bearing? What is the "one piece Shopsmith 2 bearing quill"?
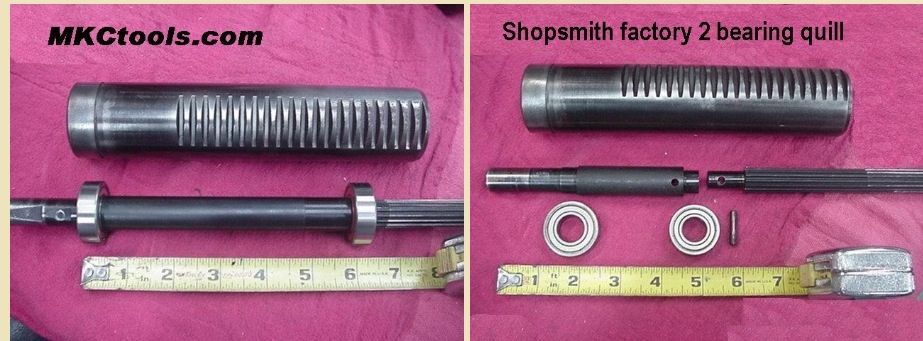
Someone else will need to fact check this but: I think shopsmith has redesigned the two bearing quill several times. The first versions were a two piece spline. This is how both my shopsmiths are and it's on my list of upgrades as I consider it subpar. The current version is a one piece spline with two bearings up front and is the way Bill does his. Skip does his the way the 10ER's were designed.
I don't have first hand knowledge of which way is better, but I honestly think the larger bearing, machined into the back would limit runout the most. I do know Bill has done lots of testing and I'm sure shopsmith has as well.
I'll see I I can find a picture of the current version but here are skips vs the original versions of the factory two bearing.
- 1986 Mark V 500 Mini
- 1985 Mark V 510 with reversible motor, bandsaw, jointer, and double-tilt.
I offer quality motor reversal, rebuilding, and rewiring. Contact me at HarbourTools@live.com
- 1985 Mark V 510 with reversible motor, bandsaw, jointer, and double-tilt.
I offer quality motor reversal, rebuilding, and rewiring. Contact me at HarbourTools@live.com
Skip's 2 bearing quill setup is the same as the first 1984 Shopsmith double bearing quill. This is a much better double bearing setup than any of the Shopsmith 2 part quill versions. The Shopsmith double bearing shown in the post is the third version that Shopsmith used. I found the back smaller 32mm bearing fails quite often and often had excessive runout. Shopsmith seems to agree with me on this as they moved a one piece shaft with the second larger bearing close to the front bearing and went to larger front bearing for the quill. I found I could get some shaft flexing (runout) with the second bearing at the front of the splines when side loads are applied to the quill. My current version uses a second 35mm bearing spaced 11mm behind the front bearing. I went through several versions like Shopsmith over many years. The drive sleeve bearings helps support the splined end of the quill.joshh wrote:Someone else will need to fact check this but: I think shopsmith has redesigned the two bearing quill several times. The first versions were a two piece spline. This is how both my shopsmiths are and it's on my list of upgrades as I consider it subpar. The current version is a one piece spline with two bearings up front and is the way Bill does his. Skip does his the way the 10ER's were designed.
I don't have first hand knowledge of which way is better, but I honestly think the larger bearing, machined into the back would limit runout the most. I do know Bill has done lots of testing and I'm sure shopsmith has as well.
I'll see I I can find a picture of the current version but here are skips vs the original versions of the factory two bearing.
Bill Mayo bill.mayo@verizon.net
Shopsmith owner since 73. Sell, repair and rebuild Shopsmith, Total Shop & Wood Master headstocks, SPTs, attachments, accessories and parts. US Navy 1955-1975 (FTCS/E-8)
Shopsmith owner since 73. Sell, repair and rebuild Shopsmith, Total Shop & Wood Master headstocks, SPTs, attachments, accessories and parts. US Navy 1955-1975 (FTCS/E-8)