
It's been mostly watching paint dry around here. had to take multiple sessions to get everything done in the available time-and weather. Quite variable.I find I can't stand rustoleum fumes in the garage anymore. Outside painting has to wait on wind and weather. Dang this paint is challenging to work with too. Painting has never been my strong suit, so maybe my skill level is to blame.
After cutting the hole in the headstock I rounded off the burr using a dremel type bit in an old Foredom tool. If you don't know these it's a variable speed rotary tool with a flexible shaft and a handheld bit. Jewelers use them. I think mine used to be a dentists drill. I've never owned a proper dremel. My wife gave me a HF knockoff with a bunch of bits. The tool died qucikly but I still have the bits that came with it. I like using the Foredom because the vibration of the motor doesn't tire your hand as much.
As to other progress, following mickyd's thread on the gilmer drive a went through that process and thanks to that thread it went smoothly. Here's a few pics:
[ATTACH]17306[/ATTACH]
disassembled:
[ATTACH]17307[/ATTACH]
To re-assemble you must compress the spring and re-insert the snap ring. Folks have used different methods to do this- here's what I did:
[ATTACH]17308[/ATTACH]
Not a great pic, it's a makeshift press using some cut-off mahogany bits from our recent porch remodel ( there short but I can't bring myself to toss them, we have buckets full.) and using the drill press to, well...press. The other end of the shaft is sitting in the hole in the drill press base. Here's a pic of the assembled shaft with new bearings (from the nearby Local Motion outlet) in front with a poly v shaft in the rear. And the tapped & drilled nut used to test for torque.
[ATTACH]17309[/ATTACH]
I found my click style torque wrench no longer worked- haven't used it since my son was a baby (he's 20). So I discovered that the Auto Zone franchise loans tools with a re-fundable deposit. I didn't like the looks of what they had in stock to purchase- and apparently don't use torque wrenches much these days.
Opening up motors is next- maybe this weekend.
TC
green and/or gray
Moderators: HopefulSSer, admin
Painting done and we're fully into mechanicals now, obtained quill and motor bearings from McGuire bearings in Portland. They have Saturday morning hours. I am in the middle of it all right now, slowed considerably by extra time at the day job today and tomorrow too. Plus the fact that now that the weather has turned we must now mow grass every weekend, and its full on garden time with everything to be planted.
I will post pictures of the ongoing work on both motors, there is not much difference between the two motors- I was expecting more of a difference actually.
Although the Green is almost 20 years older the gray is putting up much more a fight getting things apart. It was full of impacted sawdust, the motor was really packed. Here's a few pictures:
[ATTACH]17356[/ATTACH]
You can see a great lump still clinging to the motor immediately after removing it from the pan.
[ATTACH]17357[/ATTACH]
You could hardly get more sawdust into this motor than what's in here now. Completely solid, and yet it still ran.
TC
- Attachments
-
- 1-DSCN0708.JPG (94.35 KiB) Viewed 1543 times
-
- 1-DSCN0710.JPG (96.64 KiB) Viewed 1543 times
-
easterngray
- Platinum Member
- Posts: 720
- Joined: Sun Mar 11, 2007 8:28 pm
- Location: Cape Cod MA.
Finally got some work done on the Shopsmiths. I can barely remember where the story left off but the latest work has been motors. Both motors are re-assembled. I had intended to document this in more detail, as it turned out i was lucky to even get the work done.
Putting the shafts in the freezer and heating the bearings made it much easier to press the bearings on without major screw-ups.
Here's the centrifical switch end. On the A O Smith motor the switch has a single spring that crosses right over the shaft. This shows how the switch is removed to allow access to the screw attaching the switch to the shaft. I love the ingenuity of these motors and how they work.
[ATTACH]17514[/ATTACH]
Here is a pic of the contacts. Sometimes corrosion on these can cause motor starting problems or sluggishness. You can clean them up with a points file I guess. But I show this because a motor shop quoted the PO of this motor $75.00 to clean these contacts- that was their diagnosis of the bogging down the PO was experiencing.
[ATTACH]17515[/ATTACH]
Here's the motor running reassembled with its new bearings.
[ATTACH]17516[/ATTACH]
We'll see how it does under load. That'll have to wait till the budget allows new belts.
These next pics show the difference between the two motors. The second one is the 1 1/8 HP it has two much beefier springs which is nice, but the contacts look flimsier. They are leaving the 50's look behind, not massively overbuilt.
[ATTACH]17518[/ATTACH]
[ATTACH]17517[/ATTACH]
TC
- Attachments
-
- 1-DSCN0752.JPG (76.69 KiB) Viewed 1777 times
-
- 1-DSCN0751.JPG (70.62 KiB) Viewed 1765 times
-
- 1-DSCN0754.JPG (83.72 KiB) Viewed 1769 times
-
- 1-DSCN0741.JPG (96.42 KiB) Viewed 1748 times
-
- 1-DSCN0753.JPG (82.25 KiB) Viewed 1749 times
Shopsmith motors
I stock quite a few new and used Shopsmith motor parts. I can rebuild GE and AO Smith motors if the windings are not burnt or shorted. I can reverse these motors. I will also buy non-operative motors. I will be happy to answer any motor questions. I have a dedicated motor repair and rebuild section in my shop with along with all the equipment and parts to test and rebuild them.
Have a great week.
Bill Mayo annbill.mayo@comcast.net
Have a great week.
Bill Mayo annbill.mayo@comcast.net
Bill Mayo bill.mayo@verizon.net
Shopsmith owner since 73. Sell, repair and rebuild Shopsmith, Total Shop & Wood Master headstocks, SPTs, attachments, accessories and parts. US Navy 1955-1975 (FTCS/E-8)
Shopsmith owner since 73. Sell, repair and rebuild Shopsmith, Total Shop & Wood Master headstocks, SPTs, attachments, accessories and parts. US Navy 1955-1975 (FTCS/E-8)
Getting closer to having two fully functioning SS motors. When testing the gray motor with sheaves assembled it started slowly and then blew the breaker- classic symptoms I find after a quick forum search. Possibilities are bad capacitor or stuck contacts. Well I inspected contacts and found them fine and then pulled the capacitor off. I was surprised to find even the capacitor cover was full of sawdust. I had another spare capacitor from a different motor, a much larger one, that I wired in as a test. This time the motor spun up and made a shrieking sound of metal on metal. As soon as the motor spun up the fan sheave started rubbing on the motor cover, another classic problem. There's even a pdf available on the problem. The lesson for me was "tighten the setscrew, dummy". Probably got overlooked during assembly. Couldn't find the little bottle of loctite so I'm hoping it stays tight.
I returned to the original capacitor and now its running fine.
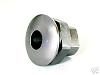
On the newer motor the spring is held on with a snap ring- the older one with a left hand threaded nut that screws on to the end of the shaft. The snap ring is easier to deal with using a drilled out piece of wood to compress the spring:
[ATTACH]17533[/ATTACH]
-like shown in the sawdust sessions, then you get the snap ring:
[ATTACH]17534[/ATTACH]
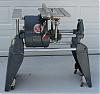
The older style takes a different approach. I compressed it with the drill press, locked the quill and the got a one inch wrench on the nut, remembering finally to turn left:
[ATTACH]17535[/ATTACH]
I suppose a person could break down and get an actual spring compressor, or make one, if you needed it often enough.
At any rate after tightening the set screws on this one, it too is running. The potential problem is that the outer pulley is sticky. It is harder to pull out that the other machine, and unlike it the pulley when pulled out wants to stay out. A light tap will persuade it, but it doesn't seem optimum. I did drill an oil hole in the pulley through the key way and installed a new piece of key stock from Mcmaster's. Maybe one of those is making it stick? Anyone encountered this? I did lube it generously.
TC
I returned to the original capacitor and now its running fine.
On the newer motor the spring is held on with a snap ring- the older one with a left hand threaded nut that screws on to the end of the shaft. The snap ring is easier to deal with using a drilled out piece of wood to compress the spring:
[ATTACH]17533[/ATTACH]
-like shown in the sawdust sessions, then you get the snap ring:
[ATTACH]17534[/ATTACH]
The older style takes a different approach. I compressed it with the drill press, locked the quill and the got a one inch wrench on the nut, remembering finally to turn left:
[ATTACH]17535[/ATTACH]
I suppose a person could break down and get an actual spring compressor, or make one, if you needed it often enough.
At any rate after tightening the set screws on this one, it too is running. The potential problem is that the outer pulley is sticky. It is harder to pull out that the other machine, and unlike it the pulley when pulled out wants to stay out. A light tap will persuade it, but it doesn't seem optimum. I did drill an oil hole in the pulley through the key way and installed a new piece of key stock from Mcmaster's. Maybe one of those is making it stick? Anyone encountered this? I did lube it generously.
TC
- Attachments
-
- 1-DSCN0745-001.JPG (82.52 KiB) Viewed 1699 times
-
- 1-DSCN0748.JPG (87.34 KiB) Viewed 1685 times
-
- 2-DSCN0760.JPG (106.61 KiB) Viewed 1686 times
-
JPG

- Platinum Member
- Posts: 34648
- Joined: Wed Dec 10, 2008 7:42 pm
- Location: Lexington, Ky (TAMECAT territory)
I would guess a burr on the inside of the drilled hole, or a burr in the keyway slot of either the shaft or the sheave.cranehead wrote:Getting closer to having two fully functioning SS motors. When testing the gray motor with sheaves assembled it started slowly and then blew the breaker- classic symptoms I find after a quick forum search. Possibilities are bad capacitor or stuck contacts. Well I inspected contacts and found them fine and then pulled the capacitor off. I was surprised to find even the capacitor cover was full of sawdust. I had another spare capacitor from a different motor, a much larger one, that I wired in as a test. This time the motor spun up and made a shrieking sound of metal on metal. As soon as the motor spun up the fan sheave started rubbing on the motor cover, another classic problem. There's even a pdf available on the problem. The lesson for me was "tighten the setscrew, dummy". Probably got overlooked during assembly. Couldn't find the little bottle of loctite so I'm hoping it stays tight.
I returned to the original capacitor and now its running fine.
On the newer motor the spring is held on with a snap ring- the older one with a left hand threaded nut that screws on to the end of the shaft. The snap ring is easier to deal with using a drilled out piece of wood to compress the spring:
[ATTACH]17533[/ATTACH]
-like shown in the sawdust sessions, then you get the snap ring:
[ATTACH]17534[/ATTACH]
The older style takes a different approach. I compressed it with the drill press, locked the quill and the got a one inch wrench on the nut, remembering finally to turn left:
[ATTACH]17535[/ATTACH]
I suppose a person could break down and get an actual spring compressor, or make one, if you needed it often enough.
At any rate after tightening the set screws on this one, it too is running. The potential problem is that the outer pulley is sticky. It is harder to pull out that the other machine, and unlike it the pulley when pulled out wants to stay out. A light tap will persuade it, but it doesn't seem optimum. I did drill an oil hole in the pulley through the key way and installed a new piece of key stock from Mcmaster's. Maybe one of those is making it stick? Anyone encountered this? I did lube it generously.
TC
I use the 'horizontal' drill press method and support the motor from a shelf setting on the way tubes with a socket held by a 4 jaw chuck.
I like the newer clip retainer since it will work when running reverse as well.(modified motor wiring etc.) Rotate nut by quill shaft.
╔═══╗
╟JPG ╢
╚═══╝
Goldie(Bought New SN 377425)/4" jointer/6" beltsander/12" planer/stripsander/bandsaw/powerstation /Scroll saw/Jig saw /Craftsman 10" ras/Craftsman 6" thicknessplaner/ Dayton10"tablesaw(restoredfromneighborstrashpile)/ Mark VII restoration in 'progress'/ 10E[/size](SN E3779) restoration in progress, a 510 on the back burner and a growing pile of items to be eventually returned to useful life. - aka Red Grange
vinigar
As far as the tubes are concerned. One method you might want to try is soaking them in vinigar for two weeks. Then use a scratch pad. I made some tubes out of 2' pvc from menards. I put a cap on one end a thread cap on the other end. insert tube fill with vinigar. I used distilled white vinigar from sams. 4.00 for 2 gals. Had some left over. It does not leave them sparkeling. It seems to yellow things alittle, but will take the rust off.
Sunset22
Sunset22
I have heard about vinegar, haven't tried it yet. I used electrolysis on all the tubes for two machines. Just last night I finished sanding a set of tubes by spinning them with a drill in a home made lathe set up.
Today I am assembling the carriage. I got this machine already disassembled, so I've never seen it together. Still needs belts and most likely a few other things but I can't wait to see how it looks on the floor- and how it's going to be to work with.
TC
Today I am assembling the carriage. I got this machine already disassembled, so I've never seen it together. Still needs belts and most likely a few other things but I can't wait to see how it looks on the floor- and how it's going to be to work with.
TC