the used 510 i bought last fall had a greenie caster set installled on it. when i was going to put the new SS casters on it the levers would hit the casters. i took the lift kit from my 500 and put the new casters on it.
the olders ones have the levers closer to the edge of the casters. use a 1/8 punch and knock out pin in lever and move over enough to clear new casters and will work fine. i think this was covered in another thread somewhere on the forum............
Shopsmiths 3" caster upgrade as it unfolds
Moderators: HopefulSSer, admin
-
dusty

- Platinum Member
- Posts: 21368
- Joined: Wed Nov 22, 2006 6:52 am
- Location: Tucson (Wildcat Country), Arizona
Shopsmith 3" casdter upgrade
The fact that some users are having an interference problem (between the control lever and the 3" wheel) seems to be proof that there are different versions of caster assemblies.
I just went out to the shop to look at mine and there is NO WAY that this interference could exist on this machine. I would post pictures but I dare not spend that much time in the shop.
I spent some time in the cardiac unit of the nearest hospital last week and as a result my wife has set down some ground rules that don't include shop time until I have my followup visit with the doctor.
"Making Sawdust Safely"
Dusty
Sent from my Dell XPS using Firefox.
Dusty
Sent from my Dell XPS using Firefox.
more info on lifts
i went out and measured on my two shopsmiths..
from the inside of the lift cam to center of roll pin is
7/8 inch on the older version and 2 1/4 inch on the newer version which
i bought from shopsmith a few years ago.
the wheels clear on the new version just fine. so, knock pin out and mover
lever over and you will have a slick set of wheels.......also a picture of the
steel wheels that were on the older one i think they came from a greenie
because, the brackets were painted green. i repainted them grey[ATTACH]17055[/ATTACH]
[ATTACH]17056[/ATTACH]
[ATTACH]17057[/ATTACH]
- Attachments
-
- IMG_2435.JPG (97.85 KiB) Viewed 15265 times
-
- IMG_2436.JPG (102.42 KiB) Viewed 15270 times
-
- IMG_2437.JPG (121.13 KiB) Viewed 15267 times
-
jcraigie
- Platinum Member
- Posts: 505
- Joined: Sun Sep 05, 2010 8:17 pm
- Location: Fowlerville, Michigan
I also have an old greenie and a newer 500 ('84) and without measureing but simply looking at them I have the exact same situation as oldc6 the old greenine would be a problem (about 1") but the newer machine would breeze through no problem (about 2")oldc6 wrote:i went out and measured on my two shopsmiths..
from the inside of the lift cam to center of roll pin is
7/8 inch on the older version and 2 1/4 inch on the newer version which
i bought from shopsmith a few years ago.
the wheels clear on the new version just fine. so, knock pin out and mover
lever over and you will have a slick set of wheels.......also a picture of the
steel wheels that were on the older one i think they came from a greenie
because, the brackets were painted green. i repainted them grey[ATTACH]17055[/ATTACH]
[ATTACH]17056[/ATTACH]
[ATTACH]17057[/ATTACH]
1984 Mark V 500 and an early 1954 greenie. jointer, belt sander, bandsaw, jigsaw, planner.
Jeff
Jeff

Dusty,
You are far to valuable to all who participate here. When the boss lady says stop now believe her. I seem to be getting a lot more of that conversation on a daily basis. When I listen I feel better. The days I ignore her I am miserable. The hardest part being she has everyone around me trained to create accountability. Man I hate it when the are right. Listen my friend we appreciate you greatly. Jim
You are far to valuable to all who participate here. When the boss lady says stop now believe her. I seem to be getting a lot more of that conversation on a daily basis. When I listen I feel better. The days I ignore her I am miserable. The hardest part being she has everyone around me trained to create accountability. Man I hate it when the are right. Listen my friend we appreciate you greatly. Jim
F. Jim Parks
Lakewood, Colorado:)
When the love of power is replaced by the power of love the world will have a chance for survival.
Lakewood, Colorado:)
When the love of power is replaced by the power of love the world will have a chance for survival.
-
dusty
- Platinum Member
- Posts: 21368
- Joined: Wed Nov 22, 2006 6:52 am
- Location: Tucson (Wildcat Country), Arizona
Thanks for the comments, all of you. But let me set the record straight. I did not have heart failure or a heart attack. I suffered a case of arrhythmia (erratic heart beat).
It was apparently a serious case because they had difficulty getting me back in rhythm but then I have never had rhythm and I cannot dance.
After a few shots, hours on an IV and a couple electrocardiograms and no meals - things finally got better. I am home now and I feel fine. Can't convince the better half of that but I do.
Until I do convince her, she'll be standing in the doorway every time I try to go to the shop.
I have a feeling that the hard part is coming next week when I have my followup with the cardiologist. I have a nagging feeling that I will be told to drop 30-40 pounds or else.
"Making Sawdust Safely"
Dusty
Sent from my Dell XPS using Firefox.
Dusty
Sent from my Dell XPS using Firefox.

We are too young for this crap.
I just had to have a butt load of blood-work done and a liver sonogram.
Next week is the big "reveal" wife is driving down here from the coast for the tests results so we can see if there is gonna be a reason to bother planning the next 20 years or so together.
I was diagnosed 10 years ago with something I would rather not mention, and the clock has been ticking. I hate this and I feel for all you folks going through similar situations. Good luck to all of us.
www.wirewerkes.com
Hiding in a Joshua Tree.
Hiding in a Joshua Tree.

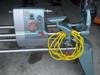
Had some time today so I took off the caster assy on one end of the machine to have a better look. Looks like the dust and spiders and moisture had some fun over the years. So I decided to do a clean up and to drill a new mounting hole for the "wheel foot pedal".
Of course I had my camera there and want to document what I did in case I want to do it again, and I will on the other end of the machine.
I'm going to assume you know or can figure out how to take things apart so I'm not covering that. First picture is the assembly off the machine. You can see that it is the design with the pedal near the end.
[ATTACH]17100[/ATTACH]
I took mine apart so I could clean it and it also made it easier to do the drilling for the new hole. The roll pin needs to come out, but before you start spinning things about it is a good idea to mark the pedal and the rod to allow you to put it back together like it was rather then 180 degrees around.
[ATTACH]17101[/ATTACH]
[ATTACH]17102[/ATTACH]
As you can see it was a bit rusty...
[ATTACH]17103[/ATTACH]
A few minutes at the wire brush and it's looking good enough for me.
[ATTACH]17104[/ATTACH].
Next I'll show how set up for the drilling.
Ed
- Attachments
-
- DSCF3160sc.jpg (94.69 KiB) Viewed 15173 times
-
- DSCF3172sc.jpg (77.17 KiB) Viewed 15178 times
-
- DSCF3173sc.jpg (81.22 KiB) Viewed 15178 times
-
- DSCF3174sc.jpg (90.49 KiB) Viewed 15174 times
-
- DSCF3176sc.jpg (72.73 KiB) Viewed 15176 times
First things first, you will need to have the hole in the same relationship cams, it could be off a little but the closer the better. I simply use a screw through the rod and in to a wood block. A nice fit and kept vertical the rod is now held in place and orientated correctly.
[ATTACH]17105[/ATTACH]
Next came the alignment and location for the hole. A previous post gave the hole location for the new caster set so I used that. At first I was only going to move over a small amount but before I drilled I decided it was wise to use shopsmith new spacing.
[ATTACH]17106[/ATTACH]
While you could drill this dry I like to add just a small amount of oil a couple of times. You really don't need a lot and a lot means a mess where the small amount you just wipe with the paper towel and your done.
[ATTACH]17107[/ATTACH]
The drilling was pretty easy, and it takes only a few seconds to make the hole, the set up takes a lot more of your time.
[ATTACH]17108[/ATTACH]
Once the hole is through it is time to clean up the burr, a trick I learned while working in a machine shop was to simply use a large drill bit for the cleanup.
[ATTACH]17109[/ATTACH]
With that done I needed to do one more thing. Wonder what it is? Check the next post.
Ed
- Attachments
-
- DSCF3178sc.jpg (66.12 KiB) Viewed 15178 times
-
- DSCF3179sc.jpg (77.86 KiB) Viewed 15178 times
-
- DSCF3180sc.jpg (63.86 KiB) Viewed 15180 times
-
- DSCF3182sc.jpg (86.5 KiB) Viewed 15174 times
-
- DSCF3183sc.jpg (82.52 KiB) Viewed 15177 times