The jig saw frame member should be repaired by a welder who know what he is doing. I have a 10ER and the jig saw is mounted over the headstock with the upper pulley guard bolt. The quill housing extends into the broken ring in your photo and helps hold the saw on the headstock. It is fun to bring one back to shape and I would not want to part with mine, but frankly they are a pain in the back side to use. Try the C Arm saws and you will understand.
ldh
My ShopSmith ER10 Purchase - Restoration Project
Moderators: HopefulSSer, admin
I wish I could help you on this one Mike, but I can't. I have the jigsaw, but haven't really touched it yet. It came with the ER I'm working on and I stuck it on a shelf under a workbench while I work on the ER itself. When your broken part was identified, I had to go double check my jigsaw to make sure it wasn't broken like yours!
I know from discussion on the 10ER Yahoo group that there can be a bit of vibration in the jigsaw. You might have to adjust the speed to find the "sweet spot" where the vibration is minimized. Having never used it myself, I don't know how bad or forceful the vibration is, but it's possible that the ring does endure a good bit of stress.
I know from discussion on the 10ER Yahoo group that there can be a bit of vibration in the jigsaw. You might have to adjust the speed to find the "sweet spot" where the vibration is minimized. Having never used it myself, I don't know how bad or forceful the vibration is, but it's possible that the ring does endure a good bit of stress.
Just for clarification, you're talking about the jigsaw being a pain to use, not the 10ER, right?ldh wrote:The jig saw frame member should be repaired by a welder who know what he is doing. I have a 10ER and the jig saw is mounted over the headstock with the upper pulley guard bolt. The quill housing extends into the broken ring in your photo and helps hold the saw on the headstock. It is fun to bring one back to shape and I would not want to part with mine, but frankly they are a pain in the back side to use. Try the C Arm saws and you will understand.
ldh
My first experience with a 10ER was in 1954 and I loved it then and still have one to this day, but I never learned to love the jig saw and the Lord knows I tried. On the other hand my brother could make the jig saw sing making model airplane parts and just about anything he wanted. Once I could afford one of those expensive C Arm foreign ones and a Shopsmith Scroll to boot I discovered that I just did not have any talent with a jig saw/scroll saw. Short version of a long story.
ldh
ldh
-
dusty

- Platinum Member
- Posts: 21368
- Joined: Wed Nov 22, 2006 6:52 am
- Location: Tucson (Wildcat Country), Arizona
ldh wrote:My first experience with a 10ER was in 1954 and I loved it then and still have one to this day, but I never learned to love the jig saw and the Lord knows I tried. On the other hand my brother could make the jig saw sing making model airplane parts and just about anything he wanted. Once I could afford one of those expensive C Arm foreign ones and a Shopsmith Scroll to boot I discovered that I just did not have any talent with a jig saw/scroll saw. Short version of a long story.
ldh
Maybe you want to get rid of your saw? I know someone who might take it off your hands.
"Making Sawdust Safely"
Dusty
Sent from my Dell XPS using Firefox.
Dusty
Sent from my Dell XPS using Firefox.
-
mickyd
- Platinum Member
- Posts: 2999
- Joined: Mon Feb 09, 2009 1:18 pm
- Location: San Diego, CA
- Contact:
horologist wrote:Mike,
I was wondering about that myself. I'm having trouble figuring out what that part does from the photos. I've never seen one of these machines in person.
It may be possible to have it welded. Some aluminum alloys can be welded, even some that supposedly can't be welded can still be welded.
If you do use JB Weld, it looks like there is a fair amount of meat on those lugs. You could drill a hole along the axis of the lug that goes into both pieces, as large and practical. Tap each hole, it isn't critical if the threads line up perfectly. Then insert a pin made from a smaller diameter of threaded steel rod well coated with JB weld. Prime the threads in the holes with JB Weld first. You might also make your pin from a high strength bolt or cut the threads yourself in a good piece of drill rod. The threaded rod and standard bolts at the big box stores are pretty low grade steel. If you fill the voids caused by the threads well it should have good tensile capability and be able to resist bending.
Hope this makes sense.
Troy
I understand what your saying. That does sound like a good way to do it.
The tensile spec of J-B Weld is about 4000 psi as indicated on this page from their website. From what I found doing a quick web search, cast aluminum has an tensile strength around 20-30,000 psi. If this is true, I wonder why J-B Weld advertises it "as hard and tough as steel". Are they playing with words? (Tough = what?)
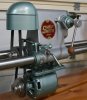
Here's a page from a book that I got with the ER10 that shows how the jigsaw mounts to the headstock. The books called "Powertool Woodworking For Everyone" by R. J. De Cristoforo (Library of Congress Catalog Card Number 51-5183). It's a 300 page book on using the ER10. You can just see that whatever is mounted to the quill that it goes through the donut shaped boss.
I definitely have to get this thing figured out. I am resisting working on the ER though. My Greenie is BEGGING me to finish her. She's SO CLOSE. I have to go work on her. Later.
- Attachments
-
 Jig Saw.pdf
- (376.58 KiB) Downloaded 873 times
Mike
Sunny San Diego
Sunny San Diego
-
horologist

- Gold Member
- Posts: 431
- Joined: Sat Dec 22, 2007 6:36 pm
- Location: Melrose, FL
Mike,
Absolutely finish the Greenie first, that is one of my failings I keep starting new projects and find it hard to get time to finish them.
Cast aluminum can vary widely 10,000 psi to 50,000 psi Ftu depending on alloy and temper. If the alloy is tempered then welding can reduce the strength of the material adjacent to the weld.
From your photo it looks like a tension failure but it also looks like the quill will act as a support. When you get ready we can investigate the fit, etc. more carefully and try to figure out load path and possibly how it broke. This will help guide the repair. I wonder if anyone in the ER group or at Shopsmith knows what alloy this may be. My first guess is sand cast pure aluminum.
For a good source for allowables and info it is hard to beat the old Mil-HDBK-5
<http://www.weibull.com/mil_std/mil_hdbk_5j.pdf>
The aluminum used in your saw may not be listed as I suspect it is completely non structural. As far as aircraft go...
Troy
The best equipped laundry room in the neighborhood...
-
dusty
- Platinum Member
- Posts: 21368
- Joined: Wed Nov 22, 2006 6:52 am
- Location: Tucson (Wildcat Country), Arizona
Wow, what a reference manual. Only 1733 pages.horologist wrote:Mike,
Absolutely finish the Greenie first, that is one of my failings I keep starting new projects and find it hard to get time to finish them.
Cast aluminum can vary widely 10,000 psi to 50,000 psi Ftu depending on alloy and temper. If the alloy is tempered then welding can reduce the strength of the material adjacent to the weld.
From your photo it looks like a tension failure but it also looks like the quill will act as a support. When you get ready we can investigate the fit, etc. more carefully and try to figure out load path and possibly how it broke. This will help guide the repair. I wonder if anyone in the ER group or at Shopsmith knows what alloy this may be. My first guess is sand cast pure aluminum.
For a good source for allowables and info it is hard to beat the old Mil-HDBK-5
<http://www.weibull.com/mil_std/mil_hdbk_5j.pdf>
The aluminum used in your saw may not be listed as I suspect it is completely non structural. As far as aircraft go...
Troy
"Making Sawdust Safely"
Dusty
Sent from my Dell XPS using Firefox.
Dusty
Sent from my Dell XPS using Firefox.
-
mickyd
- Platinum Member
- Posts: 2999
- Joined: Mon Feb 09, 2009 1:18 pm
- Location: San Diego, CA
- Contact:
Stress
horologist wrote:Mike,
Absolutely finish the Greenie first, that is one of my failings I keep starting new projects and find it hard to get time to finish them.
Cast aluminum can vary widely 10,000 psi to 50,000 psi Ftu depending on alloy and temper. If the alloy is tempered then welding can reduce the strength of the material adjacent to the weld.
From your photo it looks like a tension failure but it also looks like the quill will act as a support. When you get ready we can investigate the fit, etc. more carefully and try to figure out load path and possibly how it broke. This will help guide the repair. I wonder if anyone in the ER group or at Shopsmith knows what alloy this may be. My first guess is sand cast pure aluminum.
For a good source for allowables and info it is hard to beat the old Mil-HDBK-5
<http://www.weibull.com/mil_std/mil_hdbk_5j.pdf>
The aluminum used in your saw may not be listed as I suspect it is completely non structural. As far as aircraft go...
Troy
Just looked at your profile Troy and saw that your a stress engineer. Yee Haa! I'm going to follow your lead on the repair of the broken boss. Naturally, my goal will be to maintain the original appearance. I am sure it can be done somehow.
I can't imagine the boss being stressed to the point of failure during operation. It's just seems like too much material to break. I took some close-up shots for you to chew on until we're ready to tackle a repair.
I see a clue. I noticed the boss has a fairly substantial dent on the top left side.
-
-
-
[ATTACH]4057[/ATTACH]
-
-
-
-
-
-
-Here's the left hand and right hand view. Note: The left and right sides measure 5/8" at top and left measures 1" at the bottom and right measures 3/4" at the bottom.
Quick link back to assembly view
-
[ATTACH]4058[/ATTACH][ATTACH]4059[/ATTACH]
- Attachments
-
- Img_5409mod.jpg (45.92 KiB) Viewed 6358 times
-
- Img_5406modleft.jpg (34.96 KiB) Viewed 6358 times
-
- Img_5406modright.jpg (24.71 KiB) Viewed 6356 times
Mike
Sunny San Diego
Sunny San Diego